Elixir Scramble: How to Win
A 30-minute alliance-versus-alliance point battlefield: five stages, control-based scoring, Healing Tent priority, teleport rules, and the wall mistake that ends your run in 10 minutes.
☰ On this page 63 ▾
🗓 Updated: 2026-10-12
Elixir Scramble is a 30-minute alliance-versus-alliance battlefield where the winner is decided by points, not by who kills more troops. Alliances that treat it like a deathmatch lose to alliances that treat it like a map-control game — every time.
This guide covers the five stages of the event, where the points actually come from, teleport rules, defense logic, and the one mistake that ends a run before it starts.
The Five Stages
Every scramble runs the same arc, about six minutes per stage across the half hour:
- Matching — the system pairs alliances.
- Entry prep — you load in, position, and get your squads off the wall (see the wall warning — this stage is where runs are lost).
- Early strongholds — the first buildings unlock and the opening land-grab happens.
- Mid decisive battles — the contested center becomes the point pivot; most of the event is won or lost here.
- Late accumulation — held buildings tick out the final points; the alliance that stayed active to the last second collects the difference.
Registration and Timing
- Players sign up as Team A or Team B, or the R5 signs the alliance up directly.
- After registration closes, nobody can be added. No late joiners, no substitutes — if half your alliance sleeps through sign-up, you fight short-handed.
- Registration Reminder Mails (July 2026 update): The game sends automatic reminder mails to alliance officers: 4 hours before deadline for unregistered alliances, and 2 hours before deadline if fewer than 10 members are registered.
- Scheduling example: a scramble that starts at 3PM CST runs at 9PM UK. Check the event timer in your own timezone and set an alarm — the event rewards being online at the exact start, not five minutes in.
Where Points Come From
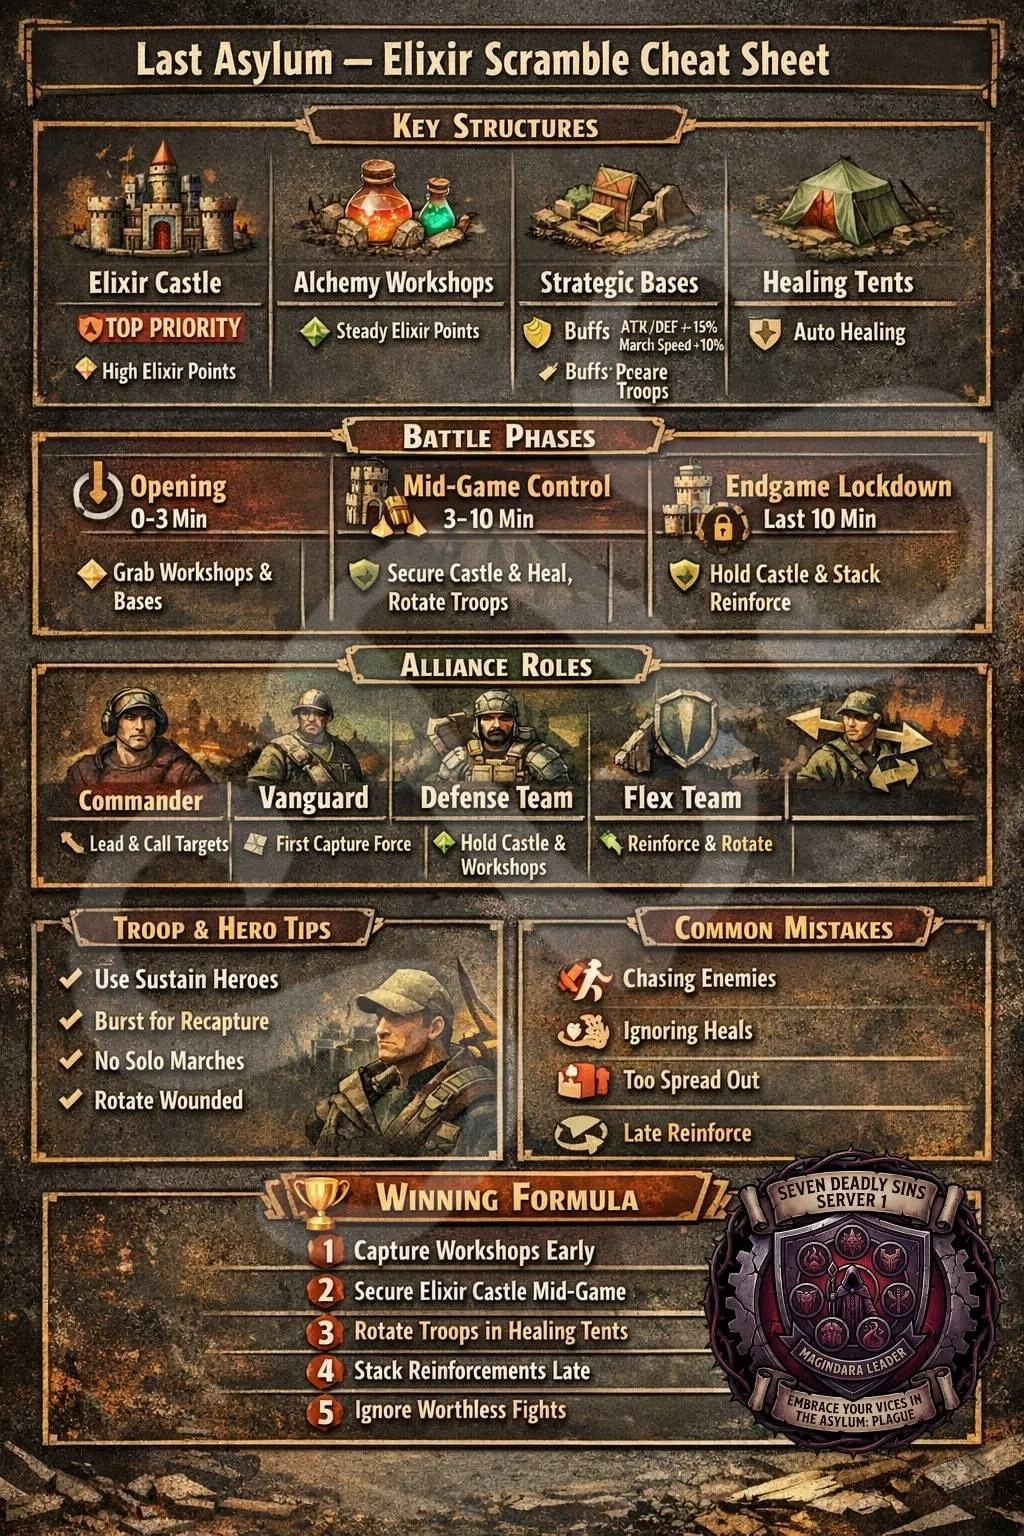
The core rule, and the one most alliances get wrong: points come from CONTROL, not from kills. Killing enemy squads earns nothing directly. Holding buildings earns points every tick. A squad that never fights but stands on a high-value building outperforms a squad that wipes three enemies and stands on nothing.
The building hierarchy:
- Healing Tents — the second highest point building for the first 10 minutes. They heal 15 soldiers per 10 seconds, which keeps your fighting squads on the map instead of walking home. Note: speedups are useless inside the event — healing runs on the tent, not on your items.
- Camps — spawn later in the event and become the point-gathering targets; grab them when they appear.
- The central Elixir Castle — the highest-value point source on the map. This is the priority target for your strongest players: secure it and hold it. It is also the most contested, so expect the decisive battles to happen around it.
Teleport Rules
- Free teleport has a 2-minute cooldown — and teleporting cancels any marches you have out. Never reposition while your squads are mid-march to a target.
- Direct Teleport is not allowed inside the event. You cannot buy your way around the map.
- The standard play: base your city at the castle and dispatch marches outward from there. One reposition, then a short walk for everything else — this minimizes the cooldown problem entirely.
Buildings and Defense Logic
Claimed buildings do not need a garrison to keep generating points. That leads to a simple rule:
- Only defend a building if it is actually contested. Parking squads on everything you own is point-neutral and wastes your army.
- When a building does come under attack, multiple squads can defend it — stack the defense rather than feeding squads in one at a time.
- You can also choose not to defend at all: let a low-value building go, keep your squads alive, and retake it once the enemy marches elsewhere. Points tick back the moment you re-claim.
CRITICAL: Remove Squads From Your Wall Before the Start
If your squads are still on your wall when Elixir Scramble begins, you can lose your troops in under 10 minutes — and your event is over for the remaining 20.
Wall squads get caught in the opening wave of attacks, and dead squads inside the event are dead for the full half hour. During the entry-prep stage, the checklist is:
- Pull every squad off the wall.
- Confirm your marches are empty and cooldowns are ready.
- Position at the castle.
- Then and only then, start dispatching.
The 30-Minute Game Plan
The winning pattern, condensed:
- Be online at the start. The early land-grab of strongholds decides who plays from ahead.
- Stay active the full 30 minutes. Points accumulate the entire time; the alliance that checks out at minute 20 donates the last third of the event.
- Hold, don’t overextend. Secure what you have before opening a third front. A building you hold to the end beats two buildings you briefly touched.
- Rotate and reinforce. Squads on contested buildings need fresh bodies; rotate tired squads back through Healing Tents.
- Prioritize high-point buildings. The Elixir Castle first, Healing Tents early, Camps when they spawn.
- Never go solo. A single squad attacking a defended point dies alone and contributes nothing. Move with your alliance or don’t move.
Elixir Scramble rewards discipline over power. A weaker alliance that holds the right buildings and never stops rotating will beat a stronger alliance chasing kills — because kills were never worth anything.
📊 Score & Reward Tables
Verified values from game client data (v1.0.87), source: wiki-last-asylum.com. Base values shown without Academy or event research bonuses.
Source: wiki — elixir-race
The battlefield map
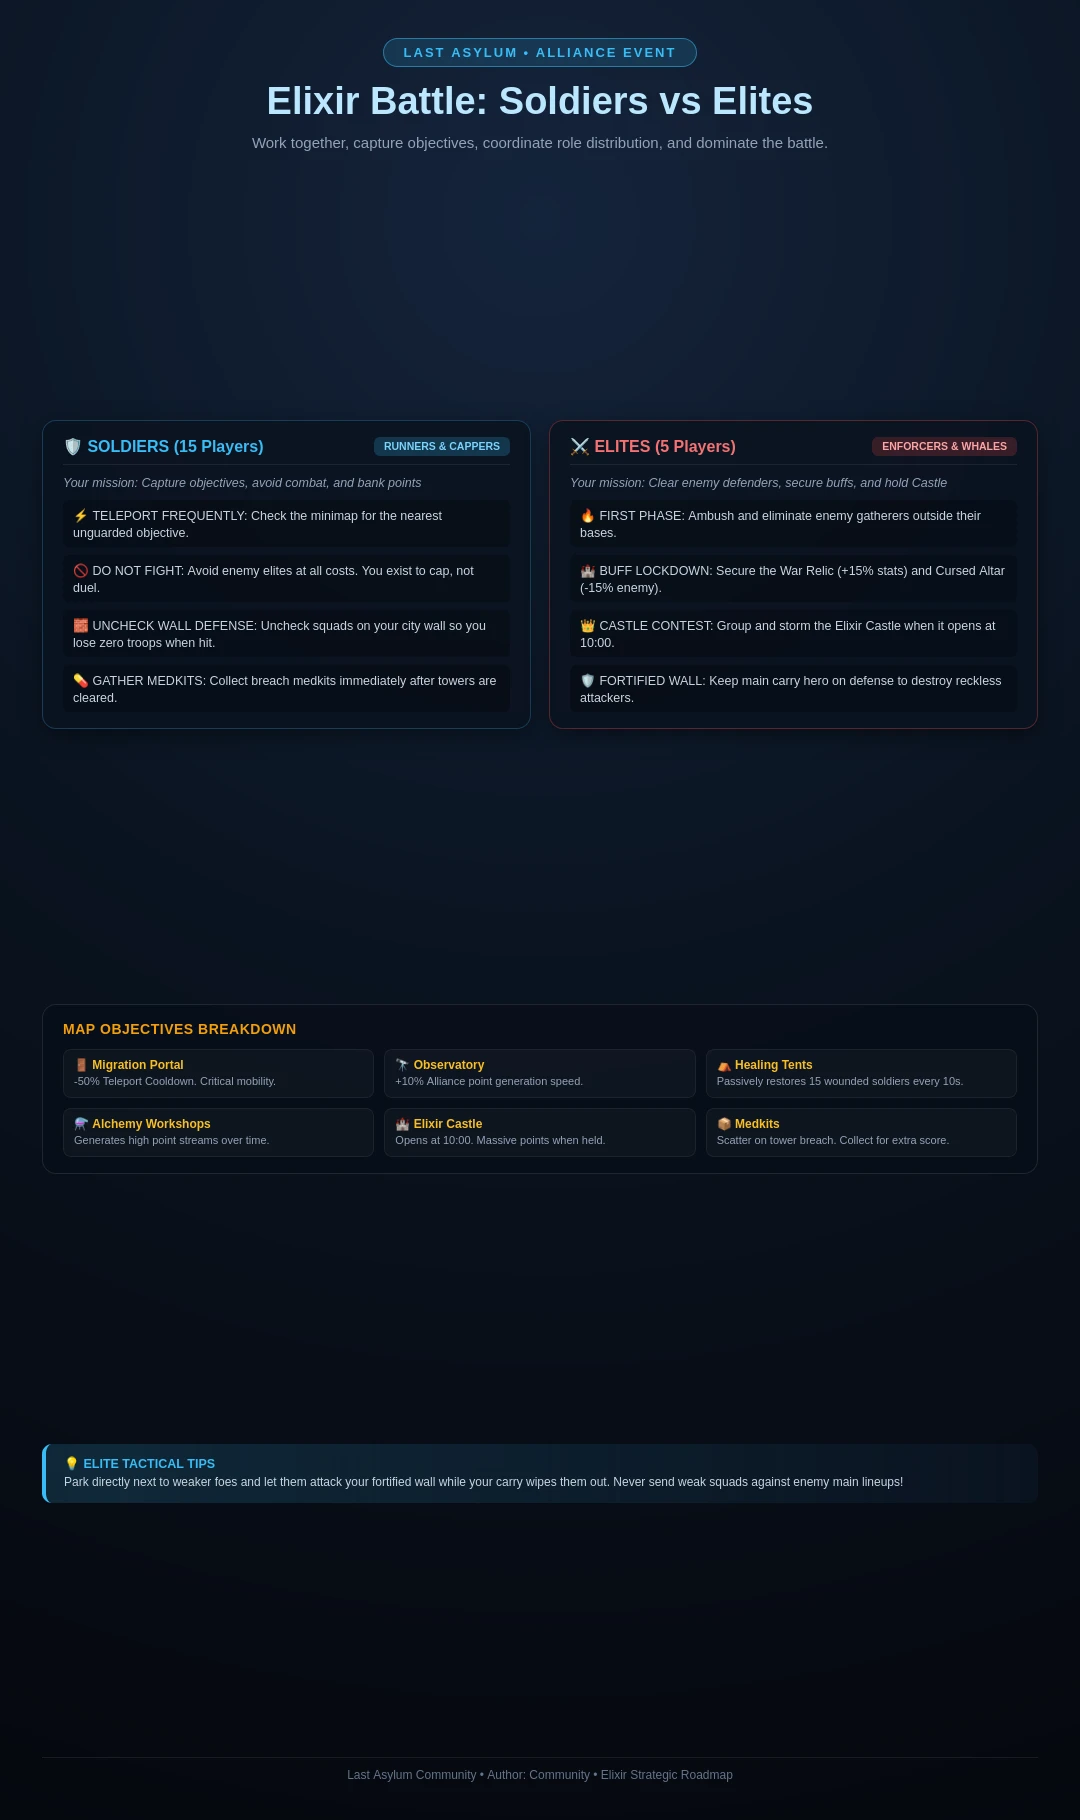
| # | Structure | Position | Alliance points | Extra effect |
|---|---|---|---|---|
| 1 | Elixir Castle | center | 48 / 32 | - |
| 2 | War Relics | center | 6 / 4 | allies gain +15% hero HP, ATK and DEF |
| 3 | Cursed Altar | center | 6 / 4 | enemies lose 15% hero HP, ATK and DEF |
| 4 | Alchemy Workshop | by the west entrance | 30 / 20 | - |
| 5 | Alchemy Workshop | by the east entrance | 30 / 20 | - |
| 6 | Migration Portal | eastern half | 6 / 4 | city relocation cooldown 50% shorter |
| 7 | Observatory | western half | 6 / 4 | all alliance points grow by 10% |
| 8 | Healing Tent | by the west entrance | 18 / 12 | heals 15 wounded every 10 seconds |
| 9 | Healing Tent | by the east entrance | 18 / 12 | heals 15 wounded every 10 seconds |
| 10 | Healing Tent | western half | 18 / 12 | heals 15 wounded every 10 seconds |
| 11 | Healing Tent | eastern half | 18 / 12 | heals 15 wounded every 10 seconds |
Official in-game rules (client v1.0.102)
Elixir Scramble
As the plague spreads across the world, the most scarce resource is always the cure for diseases. According to ancient texts, mysterious herbs grow in a land that only opens on the night of the Blood Moon. It is said that a large quantity of elixirs is hidden within the legendary Elixir Castle, and these elixirs can effectively treat various diseases, attracting many to compete for them…
Entrance Area
Entry Area Two alliances will enter from the east and west sides of the battlefield, competing for points to achieve ultimate victory.
Elixir Castle
The most crucial structure on the battlefield, located at the center of the area. The castle gates open 10 minutes into the battle, granting substantial points upon capture.
Alchemy Workshop
There are 2 Alchemy Workshops, located near the entrance areas of 2 alliances. Capturing them grants substantial points continuously, and they should be prioritized at the start of the battle.
Healing Tent
There are 4 pre-built Healing Tents on the battlefield. Capturing them not only grants a moderate amount of points but also heals wounded soldiers.
[Healing Tent] heals 15 Wounded Soldiers every 10s.
Strategic Outpost I
Strategic Base I There are numerous strategic facilities on the battlefield. Capturing them provides a small amount of points over time and various benefits.
[Migration Portal] City relocation cooldown reduced by 50%. [Observatory] Allied point efficiency increased by 10%.
Strategic Outpost II
Strategic Base II After 10 minutes of battle, all remaining strategic bases will be accessible. Capturing them grants a small amount of points over time and combat buffs.
[War Relic] Increases allied Heroes’ ATK, DEF, and HP by 15%. [Cursed Altar] Reduces enemy Heroes’ ATK, DEF, and HP by 15%.
Occupation Points
[b]Occupation Points[/b] Upon occupation, points will be generated continuously. Occupied buildings will store points that can be plundered after a period of time.
Breaching Points
[b]Breach Points[/b] When a building is breached, Medkits will scatter around the area, and both sides can dispatch squads to collect them, earning a small amount of points.
Camp Points
[b]Camp Points[/b] At the 13-minute mark of the battle, camps storing a large amount of herbs will appear. Deploy troops to gather them and you earn a small amount of points over time.
Hunt
Defeating Blights in the world grants resources and items. Powerful Elite Blights require an alliance to launch an attack. The higher the Blight’s level, the greater the rewards for defeating it.
Falcon Tower
Completing various quests in the Falcon Tower grants generous rewards.
Gather
Dispatch troops to occupy Resource Spots for resource gathering. The higher the level of the Resource Spots, the more resources collected.
Battle
Engage in battles with Doctors from different alliances in the world, such as plundering territories or attacking resource points. Battles may deplete your soldiers, so proceed with caution!
Basic Rules
Upon acquisition, you receive an extra reward each time you complete a Falcon Quest, with a chance to obtain UR items from the reward chest.
Promote
Raising stars boosts abilities, improving the quality and quantity of chests obtained from quests.
Declare War
R4 or R5 can declare war on adjacent cities, allowing alliance members to siege.
Siege
Attack cities, defeat garrisons, and deplete durability to earn participation rewards.
Ranking
After the event, ranking rewards are settled based on the level and number of occupied cities.
Declare War
R4 or R5 can declare war on adjacent cities, allowing alliance members to siege.
Defeat the Garrison
During a siege, defeat the city’s garrison first. The garrison is strong, so proceed with caution.
Reduce Durability
After defeating the garrison, deplete the city’s durability. The more participants, the faster the process.
Capture City
Once City DEF is depleted, total points from defeating the garrison and reducing durability will be tallied. The alliance with the highest points takes control of the city.
Reveal
When the countdown for the Covert Operation is less than 10m, it will be visible to everyone. To avoid losses, collect quest rewards promptly!
Steal
Completed quest points will show a chest bubble. Tap the bubble to steal generous rewards. Note: Each quest can be stolen once per person per day.
Share
Each quest point can be stolen up to 3 times. Share the quest point with alliance members for the joy.
Search
In the world thumbnail, view completed quest points, with different colors for quest bubbles of varying quality.
ATK
During the Royal City battle, Alliance members can attack the city alone or in teams.
Occupy
Conquer and maintain control of the Royal City to achieve ultimate victory in the Royal City Scramble!
Settlement
At the end of the Event, claim generous rewards based on earned Honor Points!
Rules
Royal City Scramble Rules: 1, The Royal City Scramble opens once a week, and only alliances occupying Lv.6 cities are eligible to participate. 2, The Royal City Scramble lasts for 8 hours. The first alliance to occupy for 4 hours, or the one with the longest total occupation time by the end, will be the ultimate victor. 3, The leader of the victorious alliance becomes the King. 4, The Royal City is surrounded by the Cursed Land, and territories relocated there cannot activate shields, while the Falcon Tower ceases operation, halting exploration quests.
Attack Npc
Two types of Plague Rats lurk in Crystal Cluster Valley. Defeating monsters in the valley grants Skill Crystals, which upgrade Valley Skills and help you dominate the valley!
Attack/Scout Crystal Cluster
Crystal Cluster Valley contains Lv.1–Lv.3 clusters. Higher levels purify Purified Crystals faster, and the total Purified Crystals decides the final outcome. Unoccupied clusters are guarded. Defeat the defenders before you can harvest them!
Free Relocate
You can relocate for free once every 360s, then enter cooldown. During cooldown, relocation requires Targeted Relocate items, with the cost increasing by 1 item each time based on the previous use, up to 5 items per relocation.
Occupy Sacred Crystal Cave
Sacred Cave lies at the center of Crystal Cluster Valley. For the first 23 minutes after the valley opens, Sacred Cave is under protection. Once the protection ends, all players in the valley can march to the center to occupy Sacred Cave, but each player can dispatch only one team to contest it. Based on occupation ranking, the top 10 players receive a large amount of Purified Crystals as rewards, which is directly added to their total gathering amount during settlement!
Instant Crystal Cluster
Instant Crystal is a special Crystal Cluster in the valley that players can harvest quickly. It appears in six waves during the valley event at 10, 11, 12, 20, 21, and 22 minutes. It is a fast way to gain Purified Crystals during the event.
Crystal Skill
You can obtain Skill Crystals by defeating Plague Rats in the valley. After collecting enough Skill Crystals, you can learn Valley Skills. Each level has two skills, but you can only choose one. The Lv.1-Lv.4 skills are passive skills that take effect automatically after learning, while the Lv.5 skill is an active skill that you must cast manually!
Main city cannot be attacked
In the valley, players cannot launch attacks or scout other players’ main cities. Feel free to attack or gather resource points!
Specialty Choice
Specialty Selection: Handyman: All development relies on technological progress. Craftsmen earn respect through exceptional talent, becoming indispensable pillars of their cities. Legion Commander: Before absolute power, all other voices fade to insignificance. Formidable commanders sweep away all obstacles and conquer all directions.
Era Skill
Era Skills: Activate Era Skills by upgrading your Specialty Level. Each Era Skill unlocks unique functions, accelerating your Sanctuary development while enhancing your personal capabilities.
Specialty Skill
Specialty Skills: Each Specialty possesses unique Specialty Skills. Gaining a Specialty Level grants Specialty Skill Points. Upon reaching the designated Specialty Level, Lords can manually use Specialty Skill Points to activate Specialty Skills. (Some Specialty Skills are Active Skills, requiring activation within the World or Main City)
Specialty Level
Lords gain Specialty Exp by defeating monsters in the World. Accumulate Specialty EXP to increase Specialty Level. Each Specialty Level gain grants Specialty Skill Points. Upon reaching the designated Specialty Level, Lords can manually use Specialty Skill Points to activate Specialty Skills.
Specialty Reset
Use a Specialty Reset Book to reset your current Specialty and select a different one. Upon reset, all Specialty Skills are cleared and must be relearned.
EXP Overflow
Once your Specialty Level reaches its Cap, you’ll continue earning Specialty EXP at the end of the era, excess Specialty EXP converts to Items at a 30% rate. Converted Items are sent via Mail and can be used to upgrade your Specialty Level in the next era.
RES Level
RES Level is crucial for battling era Monsters. Upgrading RES Level grants RES attributes, helping you overcome era Monsters with ease. When an era ends, RES Level becomes inactive, and its RES attributes are lost. Upon the next era’s start, they reactivate.
RES Attribute
RES is the sole attribute for battling era Monsters. Each Monster has its own RES attribute. When your RES exceeds the Monster’s RES, you’ll defeat them easily; if your RES falls short, you’ll face disadvantages or even defeat in battle.
Field Tactics: Squads, Buildings, and Map Awareness
Power matters in Elixir Scramble, but it decides far less than organization. A stronger alliance loses to a weaker one that holds the Migration Gates, collects dropped points, and never parks heroes on one tent. The event runs on Fridays; alliance leadership usually assigns roles in advance — Gates, tents, alchemy, center — and the plan mail is worth actually reading. An active player beats a registered no-show every time: empty buildings and double-duty teammates follow no-shows around.
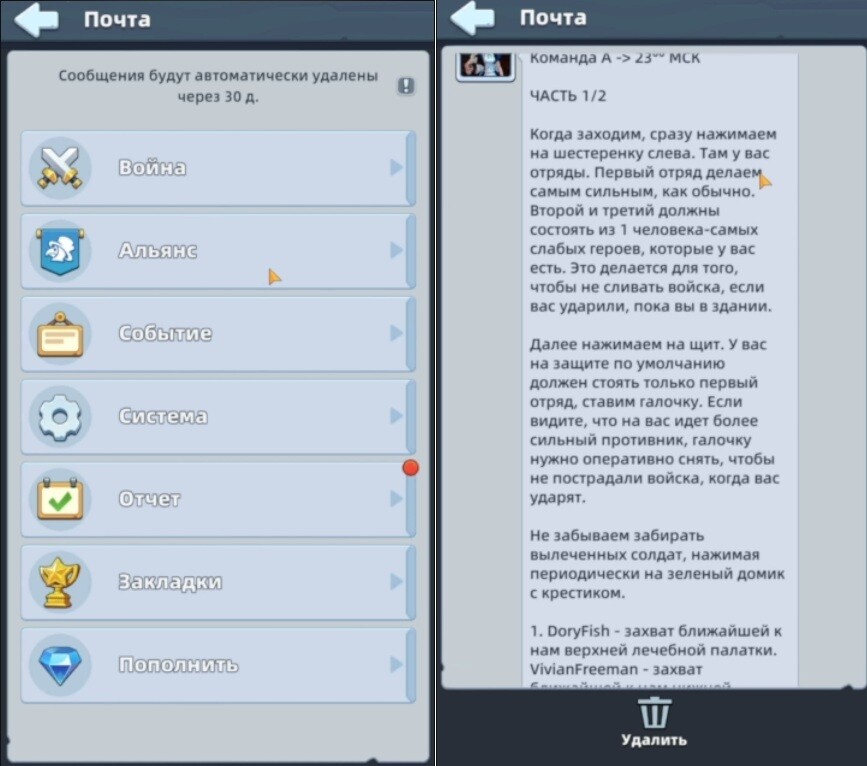
Set up three squads by role, not just by power
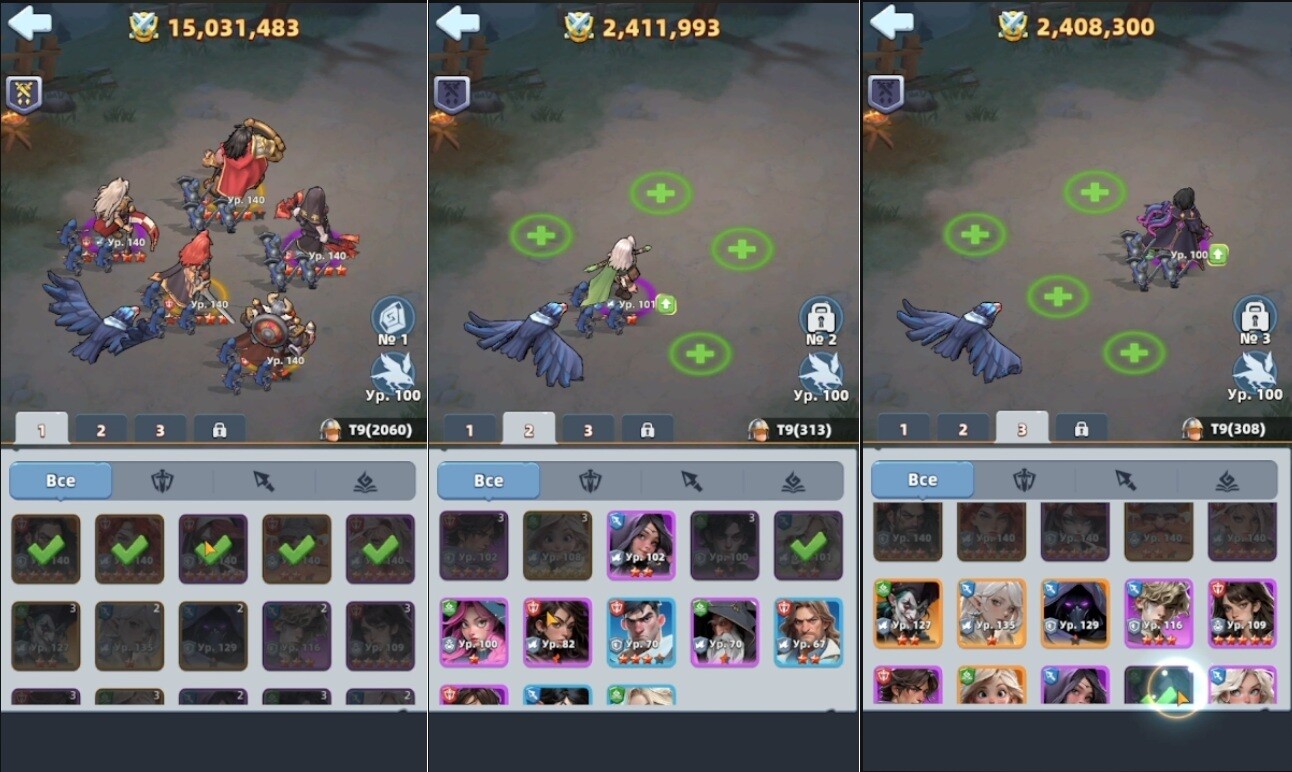
- Squad 1 is always the strongest — the main lineup that knocks out strong opponents and holds key buildings.
- Squads 2 and 3 can be light technical squads — down to a single hero. Knock the enemy out with the main force, then park a cheap squad on the point and free Squad 1 for the next attack. If the weak holder gets knocked out, losses are far smaller.
- One fights, one holds, one covers or takes extra points.
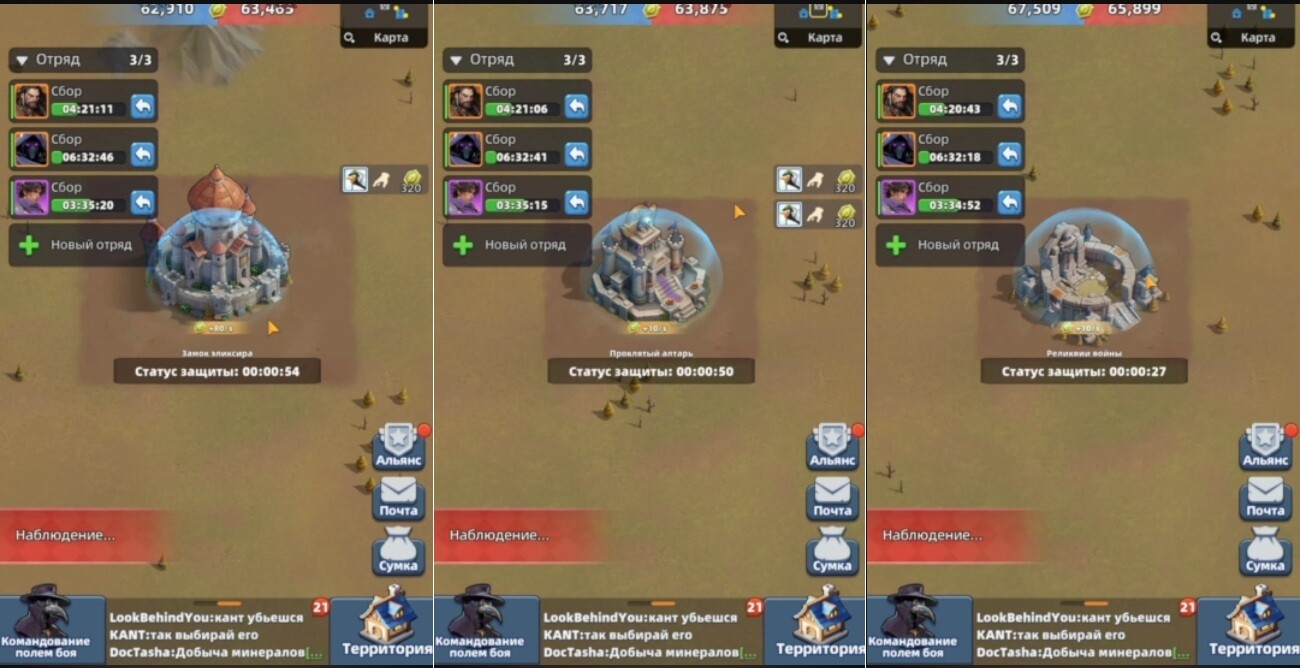
Wall check — and the scout-bait trick
Open fortress defense before the fight: leave only the strongest squad on the wall, take squads 2–3 off. Against a stronger attacker, weak wall squads are free losses — a couple thousand gone here and there, then Squad 2 exists spiritually rather than physically. Against weaker opponents the Squad 1 wall wins by itself. And if an unstoppable monster is incoming, take everything off and let them burn an empty fortress — keeping the army beats keeping the position.

Scout trick: if enemy reconnaissance is inbound, pull Squad 1 off the wall for a few seconds so the report shows an empty fortress, then put it back. An impulsive attacker launches straight into a full defense. Not magic — veterans see through it — but it works beautifully on auto-attackers.
Building priority from experience
Do not try to hold everything with eight active players and eleven points — hold the key ones:
- Migration Gates — defend from the start. −50% relocation cooldown means arriving to help on time, retaking lost buildings, escaping bad attacks, and teleporting behind someone who marched everything out. Put a strong player on Gates; if they must leave, leave at least a weak technical holder. Worst case: win a five-minute Gates fight, then both strong players fly off and leave it empty.
- Healing Tents (4 total) — hold at least two by mid-battle. 15 wounded per 10 seconds (claimed via a button) feels small until both sides have traded wipes and Squad 2 has nobody left to send. Heal in small batches to control speedup costs.
- Alchemy Workshops — steady income, no buffs (~50 points/sec each). Good once the main points are held and the team has spare people — never worth trading Gates or the center for.
- Observatory — +10% income from held buildings. Scales with map control: great at half the map, weak at two points out of ten.
- Center (opens ~minute 10): Elixir Castle + War Relic + Cursed Altar. The Castle is the richest point on the map (~80 points/sec) — prep strong players for this moment. The Relic buffs your side, the Altar weakens the enemy (check exact percentages in-game, balance shifts). Aim for Castle plus one combat point — without abandoning everything: a pretty center capture while the enemy takes Gates, two tents, alchemy, and Observatory still shows as a loss on the scoreboard.
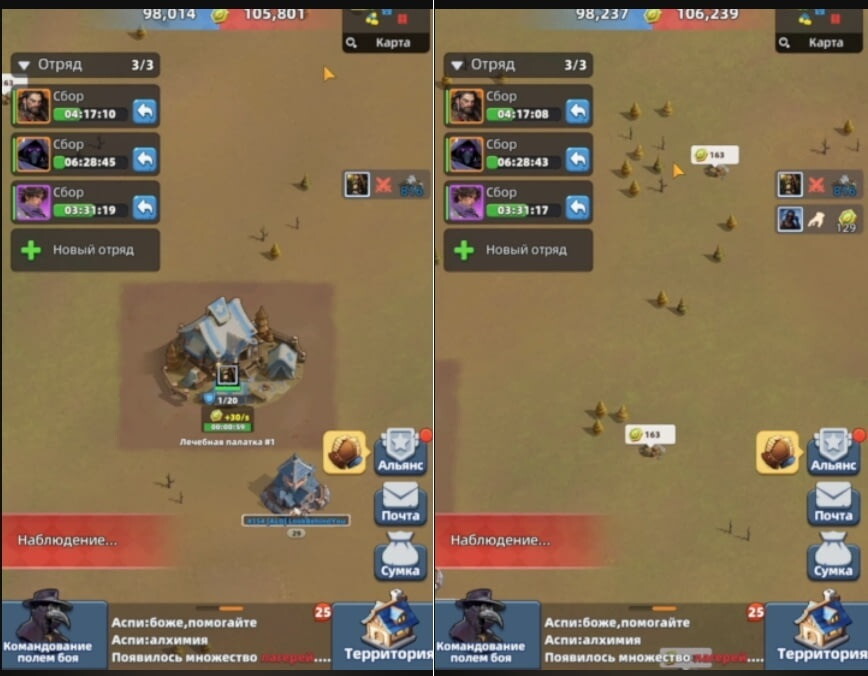
The points lying on the ground
After a capture, medkits accumulate next to the building (starting after ~a minute, growing while held). If the point flips, the stockpile scatters and anyone can pick it up — including you. Five to nine thousand points lying around a building can decide a close match:
- Watch the stockpile under your buildings; if you are about to lose the point, get ready to come back and collect the drop.
- An enemy building with a fat pile and a beatable owner becomes a priority target.
- Fast scouts are point collectors: idle holders should scan for yellow drops and race scouts to them (yours vs theirs is visible by color). Scout speed upgrades pay for themselves here.
Mid-fight habits that win matches
- Strong squad fights, weak squad holds. Never leave the best army guarding an uncontested room for ten minutes — rotate it back when a serious enemy approaches the weak holder.
- Catch the emptied fortress. When all three enemy squads march out, teleport in and hit the hollow home — even forcing the main squad to return is a win.
- Scout far targets first. A long march into an unknown fortress that evaporates is a wasted trip; if one player keeps beating you, swap targets with an ally instead of proving a point for the twentieth time.
- Out of soldiers? Stay in the event. Late camps pay ~5 points/sec each — three camps is 15/sec, which beats zero. Keep collecting medkits, scouting, and taking empty points with technical squads; near-armyless players have topped collection charts this way.
- Read chat. Short callouts (“gates empty”, “need center”, “can’t break”, “grab medkits”) are part of the tactics — ask for a swap early instead of feeding a stronger opponent for ten minutes.
- Check the after-battle report, not just your rank. Kill counts mislead; the player who quietly took free points and collected drops often outscores the brawler. Participation also pays Honor Medals, spendable in the event shop (materials, gear blueprints) — review the stats before closing the window.
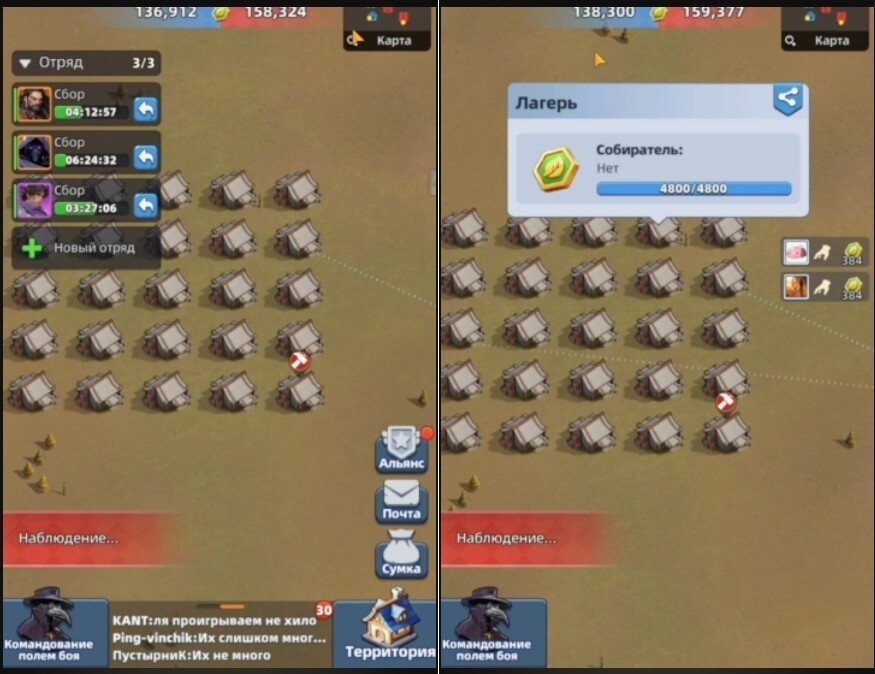
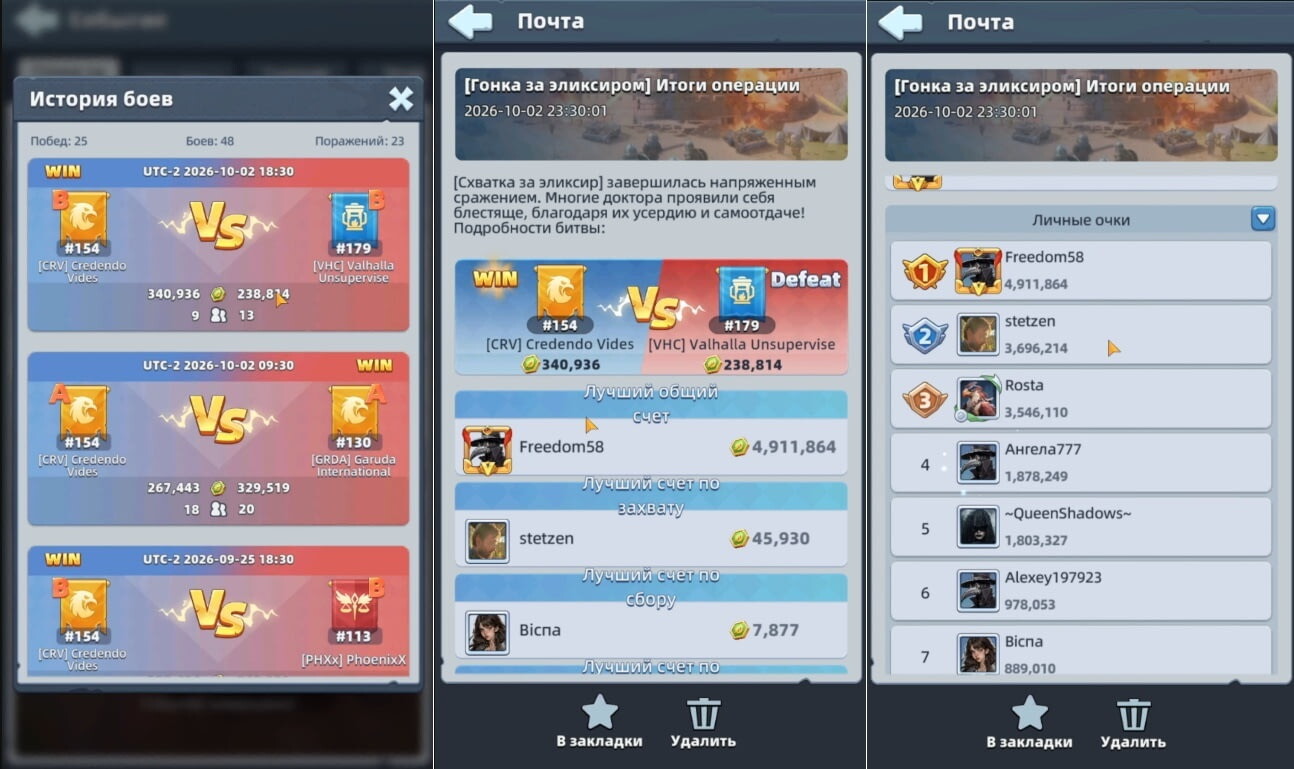
Common mistakes to skip: ignoring the plan mail, defending with weak wall squads, abandoning old points for the center all at once, and forgetting the ground loot. Watch points-per-second all game — you can burn five players beautifully and still lose the event.
Source: Гонка за эликсиром в Last Asylum: Plague - тактика и стратегии by Гейм-Знаток on DTF.
🎥 Video guides
Curated video guides and strategic breakdowns from community creators
Search YouTube for this topic: «Elixir Scramble»
Search query: Last Asylum Plague Elixir Scramble event guide
🏰 Elixir Scramble Map Structures
Official battlefield objective database. Points are scored for MAP CONTROL, not soldier kills.
Elixir Castle
[Elixir Castle] will open after the battlefield has been active for a while, granting [a massive amount of points] upon capture.
War Relics
[War Relics] will open after the battlefield has been active for a while, granting [a small amount of points] upon capture.
Cursed Altar
[Cursed Altar] will open after the battlefield has been active for a while, granting [a small amount of points] upon capture.
Alchemy Workshop #1
[Alchemy Workshop] opens when the battlefield starts, granting [a large amount of points] upon capture.
Alchemist Workshop #2
[Alchemy Workshop] opens when the battlefield starts, granting [a large amount of points] upon capture.
Migration Portal
[Migration Gate] opens when the battlefield starts, granting [a small amount of points] upon capture.
Observatory
[Observatory] opens when the battlefield starts, granting [a small amount of points] upon capture.
Healing Tent #1
[Healing Tent] opens when the battlefield starts, granting [a moderate amount of points] upon capture.
Healing Tent #2
[Healing Tent] opens when the battlefield starts, granting [a moderate amount of points] upon capture.
Healing Tent #3
[Healing Tent] opens when the battlefield starts, granting [a moderate amount of points] upon capture.
Healing Tent #4
[Healing Tent] opens when the battlefield starts, granting [a moderate amount of points] upon capture.
❓ FAQ — Frequently Asked Questions
What is the best F2P team in Last Asylum: Plague?
The canonical F2P squad is Arthur, Daskal, Marlena, Harper, Claire (all Warriors — mono-faction gives +20% HP/ATK/DEF). Arthur is free from day 1; the $1 Marlena top-up is considered the best value in the game. Daskal arrives in the first Era of Revival season (day 120+).
What should I upgrade first?
Sanctuary first, always — it gates every other building and your hero level cap. Then Training Grounds, Barracks, Research Lab, Infirmary, Wall. Keep the Builder’s Hut at Sanctuary level until Sanctuary 15 for free construction speedups.
When does Marlena unlock?
Day 66 for free — or immediately via the $1 starter top-up. Save UR shards so she lands at 8★ right away, then push 10★.
How do I get Cynthia as F2P?
Cynthia arrives via the Wishing Wheel on day 8. Save diamonds from day 1 (skip everything else) — ~11,500 diamonds total, and always spin ×10 (single spins waste tokens).
How do I get antitoxin?
Antitoxin Workshop + Stable production, every building upgrade completion, Falcon Quests (nearly all of them), Covert Ops and Caravan Trade (including plundering others’ ops — up to 5/day), and Blight/Elite Blight hunts (10/20 stamina). Events pay large amounts.
Why did my plunder income drop to almost nothing?
You hit the daily plunder limit: below the limit 100%, from 1× the limit you keep only 15%, from 1.3× only 5%. It resets at 02:00 UTC. The limit scales with Sanctuary level (2.5M at Lv.10–12 up to 30M at Lv.30) and rises immediately when you upgrade Sanctuary. A yellow triangle under your Might shows the status.
What should I buy in the shops?
Sanctuary/Expedition/Alliance shops: Crow Essence and UR Hero Omnifragments first. Honor shop is for gear blueprints only (never epigraph chests there). All shops restock Monday.
Are diamonds worth spending on speedups?
Only the VIP-shop 8h speedups are considered acceptable purchases — and only after hero resources. Community rule: never dump diamonds into speedups over hero wheel events (Cynthia day 8, Joker after day 15).
What faction should I build?
Warriors are the best early game (free Arthur/Harper shards, $1 Marlena). Rangers peak mid game (counter Warriors). Warlocks are the best late game but need heavy long-term investment. Mono-faction (5 heroes of one type) is the current meta because UR epigraphs buff a single faction.
How does Claire SSR→UR conversion work?
Opens on Era Day 8. She lands at 6★ and the run to 10★ costs 1,600 SSR shards (each substage costs 2× the SSR price). There’s a team-buff dip between 6★–9★ — skip it by banking Hall of Honor levels before converting (Lv.60→8★, Lv.100→9★, Lv.160→instant 10★).
How do I redeem gift codes?
In-game: Avatar (top-left) → Settings → Gift Code. iOS or web: log in at the official redemption page with your linked Facebook/Google account, pick server and character, enter the code.
What are the biggest beginner mistakes?
Upgrading everything equally instead of one main squad; judging heroes before high stars (Marlena is the classic late bloomer); splitting Awakening materials across heroes; wasting gems on VIP levels over hero wheels; skipping daily plunder (~27M resources/day); letting stamina cap.
📖 Read next
Did this guide help?