Ravijnverovering: Baanstrategie
De estafettegevechten over drie banen waarin uithoudingsvermogen wint van pure kracht: de estafetteregels, de limiet van 3 gevechten, de baanprioriteitsstrategie, bekende bugs en waarom dit het beste evenement zonder risico in de game is.
☰ Op deze pagina 12 ▾
🗓 Bijgewerkt: 2026-09-03
Ravijnverovering is de alliantie-baanstrijd: drie banen, en de alliantie die 2 van de 3 banen wint, pakt de overwinning. Maar het format is een estafette — de zwakste spelers vechten als eerste, en een speler blijft in de baan tot hij verliest. Begrijpen wat die estafette doet met je opstellingsstrategie is de kern van het hele evenement.
Deze gids behandelt de estafetteregels, de beloningsstructuur, de baanprioriteitsstrategie met de belangrijkste varianten, de bekende bugs en waarom dit het veiligste evenement in de game is.
De estafetteregels
- Zwakste vecht als eerste. Elke baan begint met de spelers met de laagste CP en werkt naar boven toe naarmate iemand verliest.
- De speler blijft tot hij verliest, daarna komt de volgende. Een winnende speler houdt de baan vast en blijft vechten tegen de volgende uitdager — er is geen rotatie na een overwinning.
- Max. 3 gevechten per speler. Na drie gevechten ben je klaar voor de wedstrijd.
- 15 spelers per baan. De alliantie verdeelt haar selectie over de drie banen.
Gevolg van de estafette: als je kant elk gevecht wint met elk 2 kills, vechten slechts 8 van de 15 banenspelers ooit. Zeven spelers zitten de hele wedstrijd uit zonder een gevecht te besteden. Dat feit stuurt elke opstellingsbeslissing hieronder.
Beloningen en de 3-kill-tier
- De beloning voor 3 kills is gebonden aan een rang — je hebt al je drie gevechten als kills nodig om de hoogste persoonlijke rang te bereiken.
- Omdat sterkere spelers diep in de baan sterkere tegenstanders tegenkomen, is de 3-kill-tier meestal voorbehouden aan de top van de selectie — stem je persoonlijke verwachtingen hierop af.
Rondes en groepen
- Na elke 5 rondes eindigt de wedstrijd en wordt deze herstart vanaf de registratie. Registreer opnieuw bij elke cyclus.
- Win en je stroomt door naar een hogere groep; verlies en je blijft in dezelfde of zakt naar een zwakkere groep. De ladder sorteert allianties na verloop van tijd zelf.
- Een “bye” (vrijstelling) is mogelijk, zelfs bij een volle 15 — een oneven aantal geregistreerde banen betekent dat iemand doorgaat zonder te vechten. Het is een kwestie van geluk, geen bug.
Bekende bugs
- Vervangen na 2 overwinningen zonder te verliezen — de estafette hoort je na overwinningen te laten zitten, maar sommige spelers worden na twee zeges eruit gehaald. Meld het als dit jou overkomt.
- Geregistreerde spelers uitgesloten van ronde 2. Verouderde registraties kunnen ervoor zorgen dat je buiten de volgende ronde valt. Verwijdering van de lijst is alleen R4/R5 — als je vastzit, vraag de leiding dan om je te wissen zodat je je opnieuw kunt registreren.
Baanprioriteitsstrategie
Je hoeft NIET elk gevecht te winnen — je hebt de JUISTE banen nodig.
De consensusopstelling
- Geef prioriteit aan 2 van de 3 banen. Om de wedstrijd te winnen heb je 2 banen nodig, geen 3 — je selectie gelijkmatig over alledrie verspreiden garandeert alleen maar dat je de derde alsnog verliest.
- Verdeel de top-30 gelijkmatig over twee sterke banen, en vul de resterende plekken in de derde baan.
De verfijning: Twee sterkste naar de zwakke baan
- Stuur je 2 sterkste spelers naar de ZWAKKE derde baan — zij dragen deze.
- De logica is estafette-rekenkunde: je sterkste spelers die in de sterke banen geparkeerd staan, vechten vaak nooit, omdat de zwakkere spelers van die baan winnen voordat de azen ooit nodig zijn. In de zwakke baan maken zij het verschil tussen 0-1 en een levende baan.
Het tegengeluid dat werkte
- 3 gebalanceerde teams met de top-3 speler in elk heeft ook aantoonbaar gewerkt — een anker per baan in plaats van een opgegeven baan.
Geen enkele opstelling is fout in een vacuüm. De juiste inschatting: kijk wie waar won en verloor in de volgende ronde. Je tegenstanders veranderen per groep, en de baanopstelling die deze wedstrijd won, moet de volgende ronde misschien herbalanseerd worden. Pas je aan, op de automatische piloot spelen werkt niet.
Waarom dit het beste evenement zonder risico is
Ravijnverovering kent geen troepenverlies, geen resourcerisico en geen echte uithoudingsvermogenkosten — in tegenstelling tot KvK, waar een onbeschermde stad brandt. Je vecht met geleende toernooikracht, je echte leger blijft onbeschadigd thuis. Dat maakt dit een van de beste evenementen voor veilige beloningen in de game: kom opdagen, registreer, vecht je drie gevechten, innen maar.
De enige echte kosten zijn aandacht voor de opstelling — en de estafetteregels hierboven vormen de hele opstellingsmeta.
📊 Score- en beloningstabellen
Geverifieerde waarden uit game-clientgegevens (v1.0.87), bron: wiki-last-asylum.com. Basiswaarden weergegeven zonder bonussen van Academie of evenementonderzoek.
Bron: wiki — flag-war
Last Asylum: Plague Wiki
| League (Competitie) | Vereiste medailles | Teamgrootte | Winst | Gelijkspel | Verlies |
|---|---|---|---|---|---|
| Rookie League | 0-499 | 15 | 200 | 60 | 60 |
| Novice League | 500-1.499 | 15 | 250 | 75 | 75 |
| Beginner League | 1.500-2.799 | 15 | 400 | 120 | 120 |
| Elite League | 2.800-4.499 | 20 | 600 | 180 | 180 |
| Epic League | 4.500-6.999 | 20 | 800 | 240 | 240 |
| Mythic League | 7.000+ | 20 | 1.000 | 300 | 300 |
🎥 Videogidsen
Geselecteerde videogidsen en strategische analyses van community-makers
📝 Teksttranscript 8:50 (530 сек) ▼
Zoek op YouTube naar dit onderwerp: «Canyon Conquest»
Zoekopdracht: Last Asylum Plague Canyon Conquest lane strategy
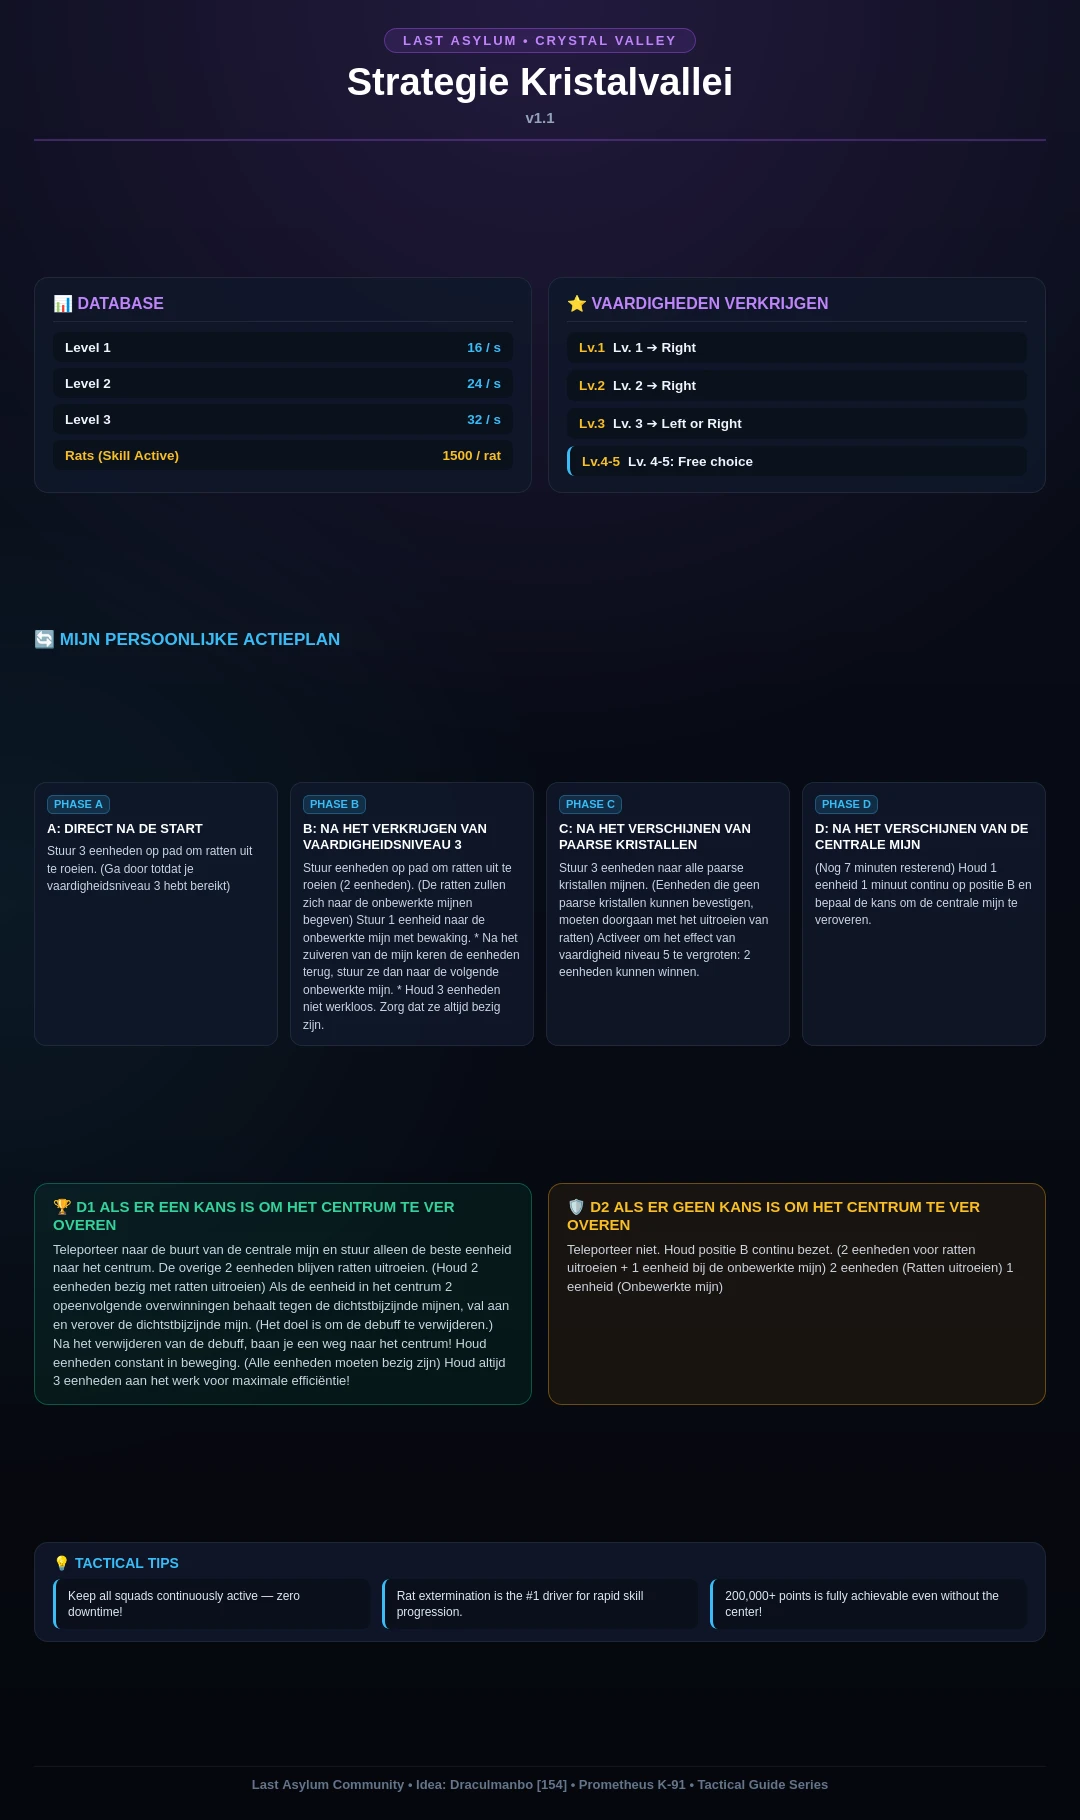
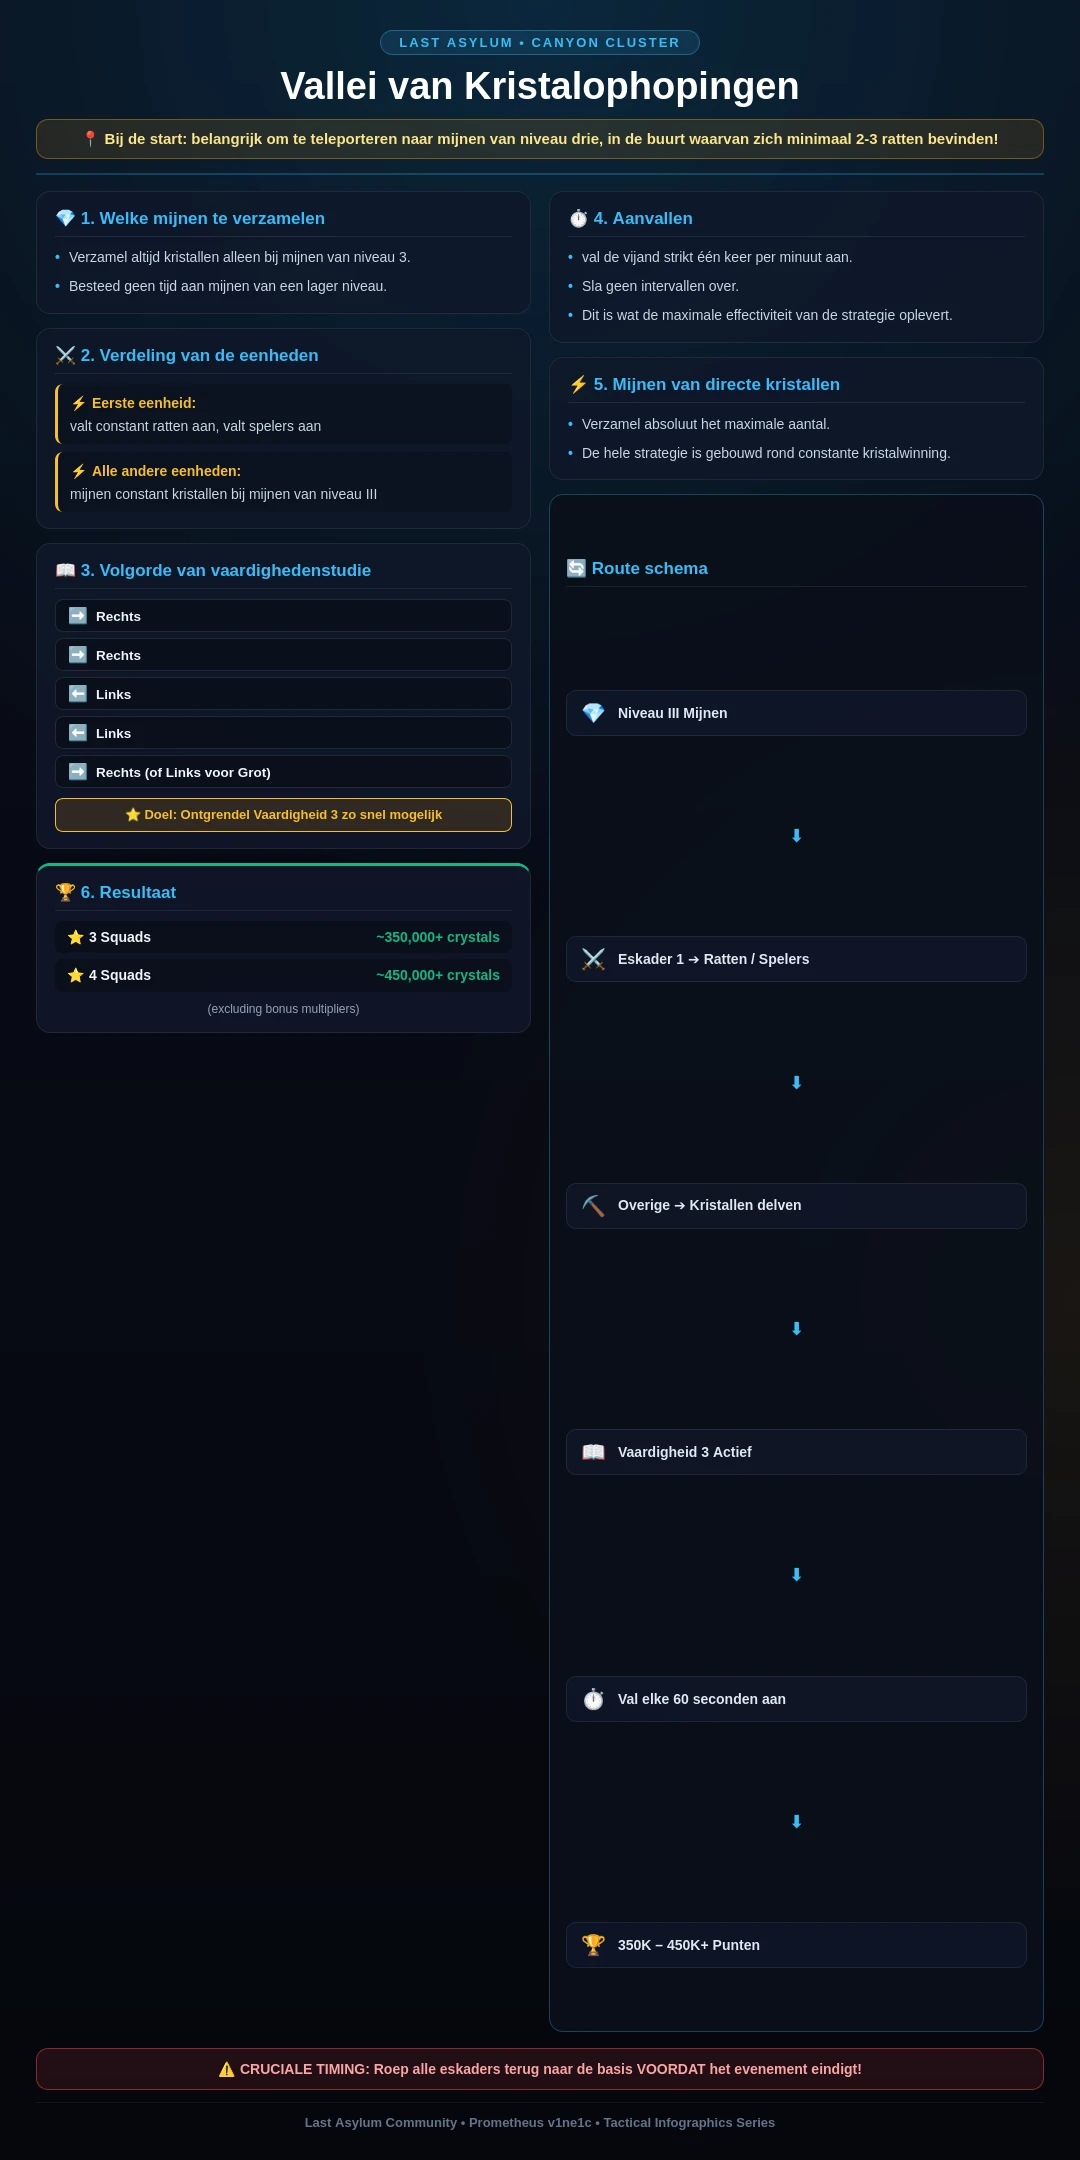
💎 Crystal Valley: Tactische Buffs & Skills
Officiële skills en verzamelvoordelen voor de Crystal Mine / Valley. Optimaliseer je opbrengst en gevechtsvoordeel.
Crystal Surge
Verzamelen & EconomieOntvang periodiek 1080 Gezuiverde Kristallen
Plaagrat Hunter
Verzamelen & EconomieOntvang 1500 extra Kristallen wanneer je een Pestrat verslaat
Force Expansion
Gevecht & MarsCapaciteit van Maart met Enkele Held +50
Swift March
Gevecht & MarsTroepenmars-snelheid in Kristalkluster Vallei +25%
Valley Plunder
Verzamelen & EconomieOntvang 5000 extra Gezuiverde Kristallen wanneer je een Ader verovert. CD: 60s
Valley Vigil
Verzamelen & EconomieOntvang 5000 extra Gezuiverde Kristallen als het niet lukt om een Ader te veroveren. CD: 60s
Crystal Mining
Verzamelen & EconomieVerzamelsnelheid van Kristalclusters verhoogt met 15%
Iron Will
Gevecht & MarsVermindert de duur van ontvangen debuffs met 30s
Valley Awakening
Gevecht & MarsVerhoogt Helden-SCHADE met 15% gedurende 60s. CD: 300s
Crystal Resonance
Verzamelen & EconomieVerhoogt tijdelijk de verzamelsnelheid van Kristalclusters met 50% gedurende 60s. CD: 300s
❓ FAQ — Veelgestelde vragen
Wat is het beste F2P-team in Last Asylum: Plague?
Het canonieke F2P-team is Arthur, Daskal, Marlena, Harper, Claire (allemaal Warriors — mono-factie geeft +20% HP/ATK/DEF). Arthur is vanaf dag 1 gratis; de $1 Marlena-opwaardeeractie wordt beschouwd als de beste waarde in het spel. Daskal arriveert in het eerste Era of Revival-seizoen (dag 120+).
Wat moet ik als eerste upgraden?
Altijd eerst het Sanctuary — het blokkeert elk ander gebouw en je maximale heldenniveau. Daarna Training Grounds, Barracks, Research Lab, Infirmary, Wall. Houd de Builder’s Hut op Sanctuary-niveau tot Sanctuary 15 voor gratis bouwsnelheidsbonussen.
Wanneer wordt Marlena ontgrendeld?
Dag 66 gratis — of direct via de $1 starter-opwaardeeractie. Bewaar UR-scherven zodat ze direct op 8★ landt, en stuur daarna aan op 10★.
Hoe krijg ik Cynthia als F2P?
Cynthia arriveert via het Wishing Wheel op dag 8. Bewaar diamanten vanaf dag 1 (sla al het andere over) — ~11.500 diamanten in totaal, en draai altijd ×10 (enkele spins verspillen tokens).
Hoe krijg ik antitoxine?
Antitoxin Workshop + Stable productie, elke voltooiing van een gebouw-upgrade, Falcon Quests (bijna allemaal), Covert Ops en Caravan Trade (inclusief het plunderen van andermans ops — tot 5/dag), en Blight/Elite Blight-jachten (10/20 stamina). Evenementen leveren grote hoeveelheden op.
Waarom is mijn plunderinkomen tot bijna nul gedaald?
Je hebt de dagelijkse plunderlimiet bereikt: onder de limiet 100%, vanaf 1× de limiet houd je slechts 15% over, vanaf 1,3× slechts 5%. Het reset om 02:00 UTC. De limiet schaalt met het Sanctuary-niveau (2,5M op Lv.10–12 tot 30M op Lv.30) en stijgt direct wanneer je het Sanctuary upgradet. Een gele driehoek onder je Might toont de status.
Wat moet ik kopen in de winkels?
Sanctuary/Expedition/Alliance-winkels: eerst Crow Essence en UR Hero Omnifragments. De Honor-winkel is alleen voor uitrustingsblauwdrukken (koop daar nooit epigraph-kisten). Alle winkels worden op maandag aangevuld.
Is het de moeite waard om diamanten uit te geven aan speedups?
Alleen de 8u speedups uit de VIP-winkel worden als acceptabele aankopen beschouwd — en alleen na heldenbronnen. Gemeenschapsregel: geef nooit diamanten uit aan speedups in plaats van aan heldenwiel-evenementen (Cynthia dag 8, Joker na dag 15).
Welke factie moet ik opbouwen?
Warriors zijn het beste voor het vroege spel (gratis Arthur/Harper-scherven, $1 Marlena). Rangers pieken in het middenspel (counteren Warriors). Warlocks zijn het beste voor het late spel, maar vereisen een zware langetermijninvestering. Mono-factie (5 helden van één type) is de huidige meta omdat UR-epigraphs één factie versterken.
Hoe werkt de Claire SSR→UR conversie?
Opent op Era-dag 8. Ze landt op 6★ en de weg naar 10★ kost 1.600 SSR-scherven (elke subfase kost 2× de SSR-prijs). Er is een dip in team-buffs tussen 6★–9★ — sla dit over door Hall of Honor-niveaus op te sparen voor het converteren (Lv.60→8★, Lv.100→9★, Lv.160→direct 10★).
Hoe wissel ik cadeaucodes in?
In-game: Avatar (linksboven) → Settings → Gift Code. iOS of web: log in op de officiële inwisselpagina met je gekoppelde Facebook/Google-account, kies server en personage, voer de code in.
Wat zijn de grootste beginnersfouten?
Alles gelijkmatig upgraden in plaats van één hoofdteam; helden beoordelen voordat ze hoge sterren hebben (Marlena is de klassieke laatbloeier); Awakening-materialen verdelen over helden; edelstenen verspillen aan VIP-niveaus in plaats van aan heldenwielen; dagelijkse plunder overslaan (~27M grondstoffen/dag); stamina laten vollopen.
📖 Lees verder
Hielp deze gids je?