Canyon Conquest: Lane Strategy
The three-lane relay battle where staying power beats power: the relay rules, the 3-fight limit, lane-priority strategy, known bugs, and why this is the game's best zero-risk event.
☰ On this page 12 ▾
🗓 Updated: 2026-09-03
Canyon Conquest is the alliance lane battle: three lanes, and the alliance that wins 2 of 3 lanes takes the match. But the format is a relay — the weakest players fight first, and a player stays in the lane until they lose. Understanding what that relay does to lineup strategy is the whole event.
This guide covers the relay rules, the reward structure, the lane-priority strategy with its main variants, the known bugs, and why this is the safest event in the game.
The Relay Rules
- Weakest fight first. Each lane starts with its lowest-CP players and escalates upward only when someone loses.
- The player stays until they lose, then the next enters. A winning player holds the lane and keeps fighting the next challenger — there is no rotation after a win.
- Max 3 fights per player. After three fights you are done for the match.
- 15 players per lane. The alliance splits its roster across the three lanes.
Consequence of the relay: if your side wins every fight at 2 kills each, only 8 of 15 lane players ever fight. Seven players sit the entire match without spending a fight. That fact drives every lineup decision below.
Rewards and the 3-Kill Tier
- The 3-kill reward is tier-gated — you need all three of your fights to be kills to hit the top personal tier.
- Because stronger players deep in the lane face stronger opponents, the 3-kill tier usually belongs to the top of the roster — plan your personal expectations accordingly.
Rounds and Groups
- After every 5 rounds the match ends and restarts from Registration. Re-register each cycle.
- Win and you move to an upper group; lose and you stay in the same or drop to a weaker group. The ladder self-sorts alliances over time.
- A “bye” is possible even at a full 15 — an odd number of registered lanes means someone advances without fighting. It is luck of the draw, not a bug.
Known Bugs
- Replaced after 2 wins without losing — the relay should keep you in after wins, but some players get pulled after two victories. Report it if it hits you.
- Registered players excluded from round 2. Stale registrations can strand you out of the next round. Removal from the list is R4/R5 only — if you are stuck, ask leadership to clear you so you can re-register.
Lane Priority Strategy
You don’t need to win EVERY fight — you need the RIGHT lanes.
The Consensus Setup
- Prioritize 2 of the 3 lanes. Winning the match needs 2 lanes, not 3 — pouring roster evenly into all three just guarantees losing the third anyway.
- Split the top-30 evenly into two strong lanes, and fill the remaining bodies into the third.
The Refinement: Two Strongest to the Weak Lane
- Send your 2 strongest players to the WEAK third lane — they carry it.
- The logic is relay arithmetic: your strongest players parked in the strong lanes often never fight, because the lane’s weaker players win out before the aces are ever needed. In the weak lane, they are the difference between 0-1 and a live lane.
The Counterpoint That Worked
- 3 balanced teams with the top-3 player in each has also verifiably worked — an anchor per lane instead of a conceded lane.
Neither setup is wrong in a vacuum. The correct read: check who won and lost where in the next round. Your opponents change group by group, and the lane setup that won this match may need rebalancing next round. Adapt, don’t autopilot.
Why This Is the Best Zero-Risk Event
Canyon Conquest has no troop loss, no resource risk, and no real stamina cost — unlike KvK, where an unshielded city burns. You fight with borrowed tournament power, your real army stays home intact. That makes it one of the best events for safe rewards in the game: show up, register, fight your three fights, collect.
The only real cost is lineup attention — and the relay rules above are the entire lineup meta.
📊 Score & Reward Tables
Verified values from game client data (v1.0.87), source: wiki-last-asylum.com. Base values shown without Academy or event research bonuses.
Source: wiki — flag-war
Last Asylum: Plague Wiki
| League | Medals required | Team size | Win | Draw | Loss |
|---|---|---|---|---|---|
| Rookie League | 0-499 | 15 | 200 | 60 | 60 |
| Novice League | 500-1,499 | 15 | 250 | 75 | 75 |
| Beginner League | 1,500-2,799 | 15 | 400 | 120 | 120 |
| Elite League | 2,800-4,499 | 20 | 600 | 180 | 180 |
| Epic League | 4,500-6,999 | 20 | 800 | 240 | 240 |
| Mythic League | 7,000+ | 20 | 1,000 | 300 | 300 |
🎥 Video guides
Curated video guides and strategic breakdowns from community creators
📝 Text Transcript 8:50 (530 сек) ▼
Search YouTube for this topic: «Canyon Conquest»
Search query: Last Asylum Plague Canyon Conquest lane strategy
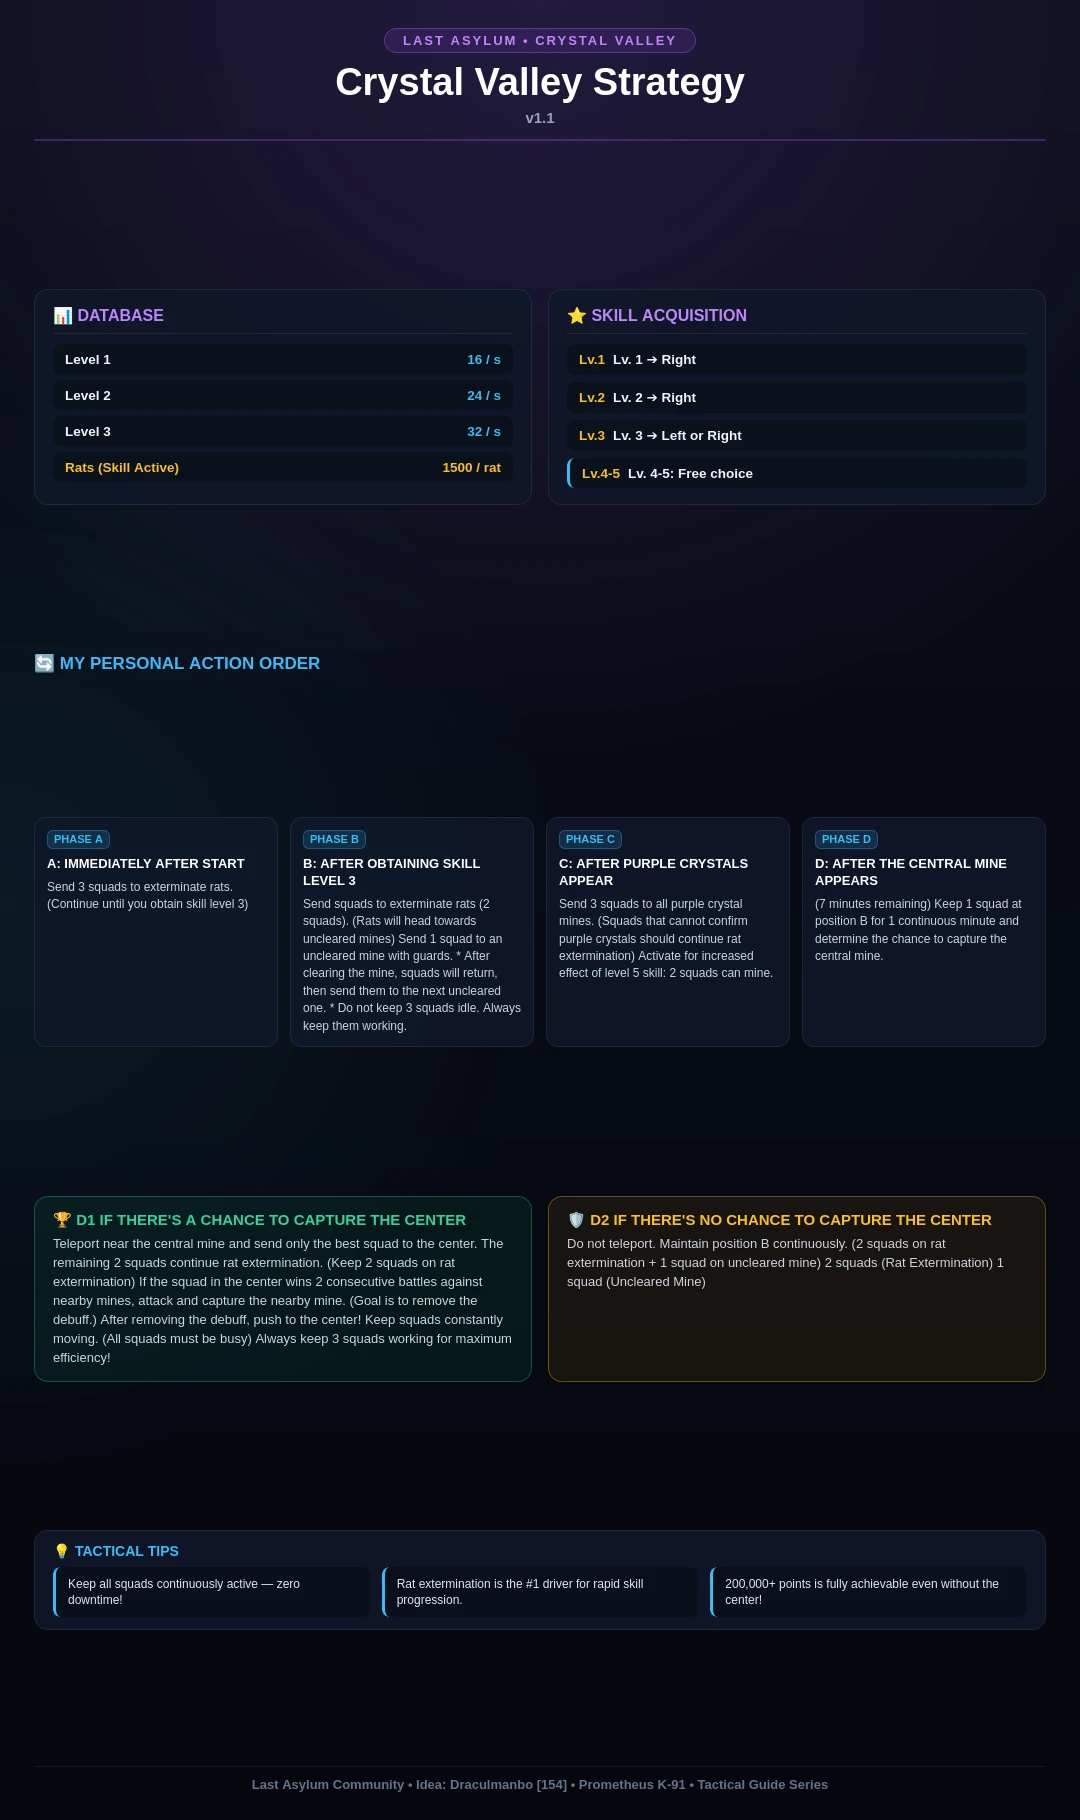
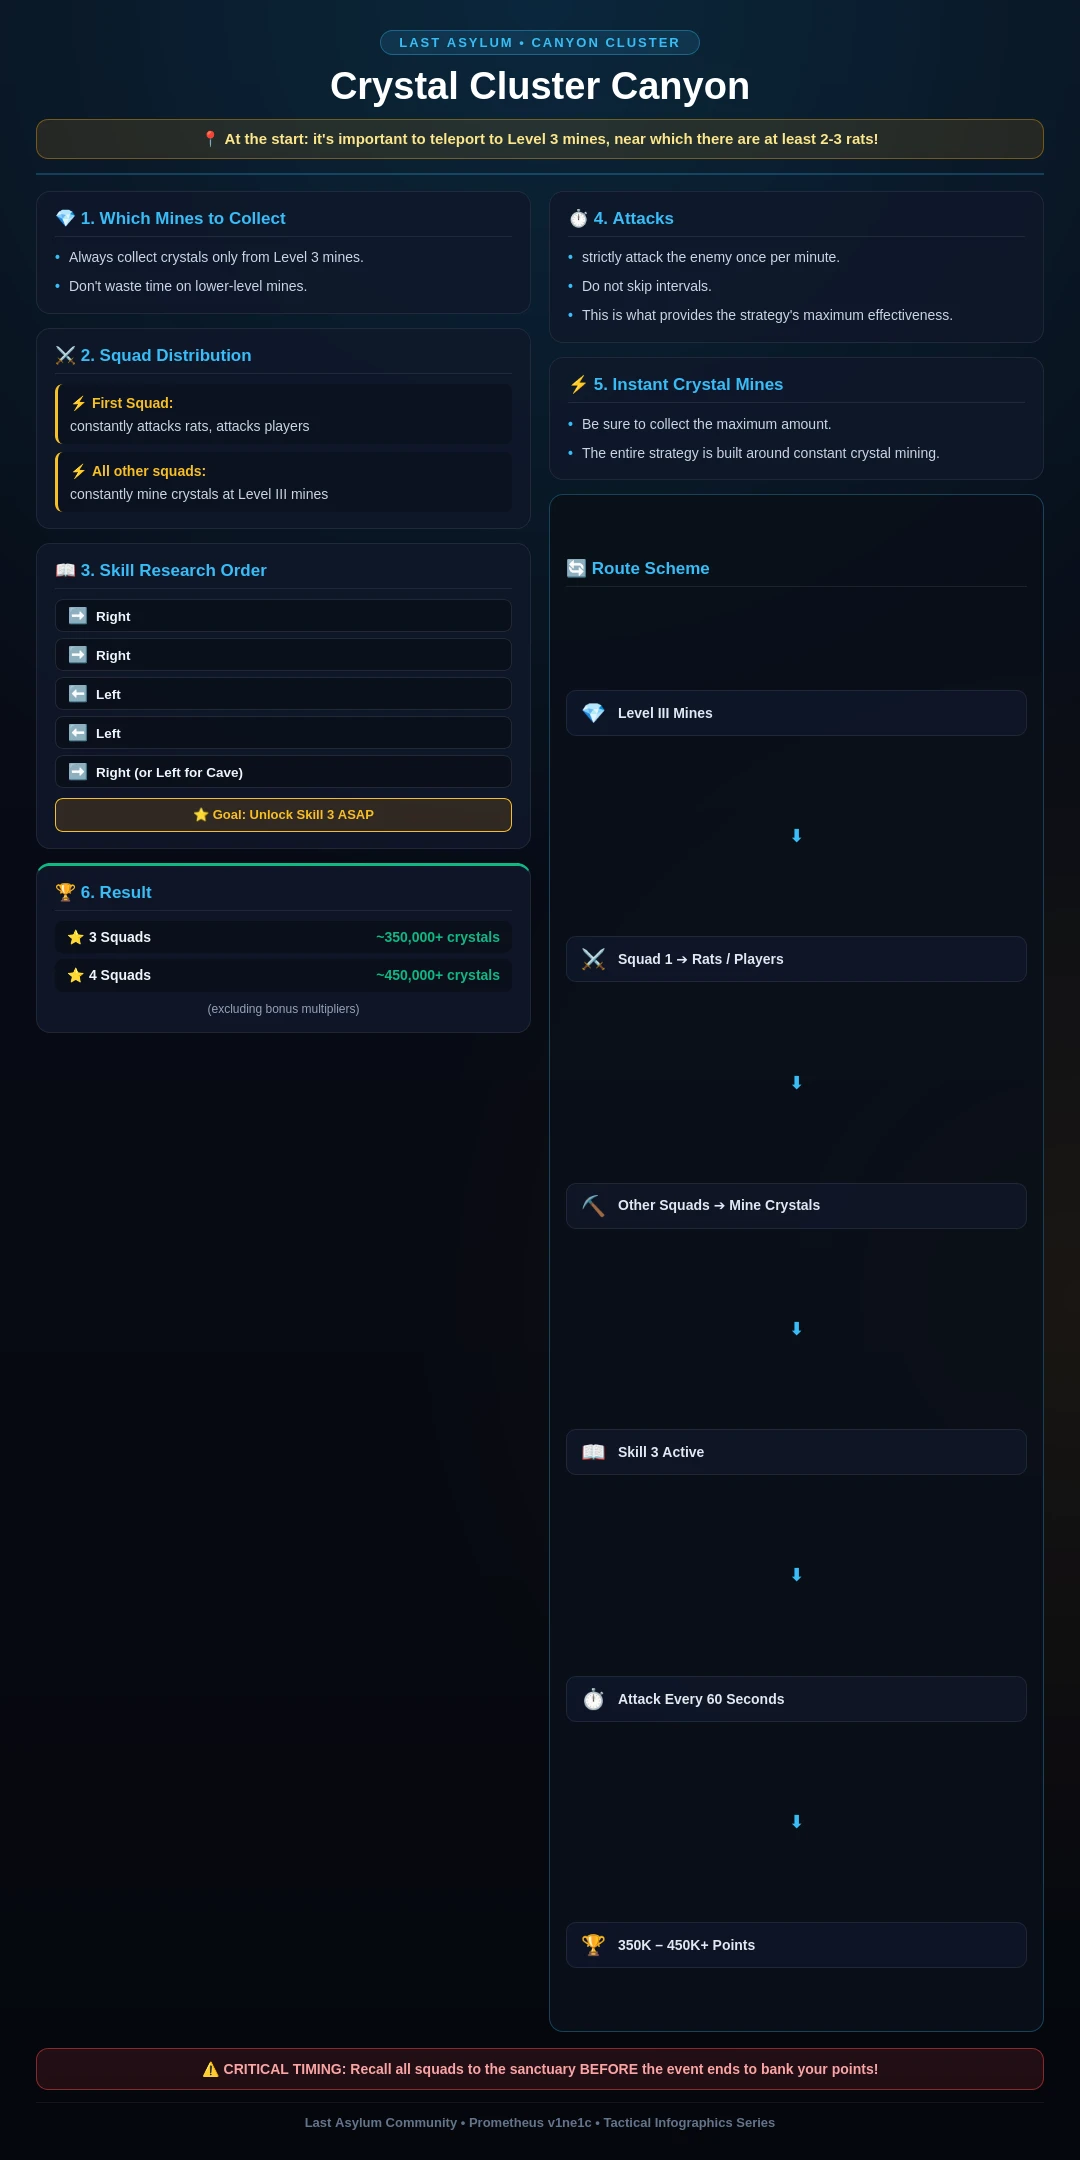
💎 Crystal Valley: Tactical Buffs & Skills
Official skills and gathering perks for the Crystal Mine / Valley. Optimize your yield and combat edge.
Crystal Surge
Gathering & EconomyPeriodically gain 1080 Purified Crystals
Plague Rat Hunter
Gathering & EconomyGain 1500 extra Crystals when you slay a Plague Rat
Force Expansion
Combat & MarchSingle Hero March Capacity +50
Swift March
Combat & MarchTroop March Speed in Crystal Cluster Valley +25%
Valley Plunder
Gathering & EconomyGain 5000 extra Purified Crystals when you seize a Lode. CD: 60s
Valley Vigil
Gathering & EconomyGain 5000 extra Purified Crystals when you fail to seize a Lode. CD: 60s
Crystal Mining
Gathering & EconomyCrystal Cluster Gathering Speed increases by 15%
Iron Will
Combat & MarchReduces the duration of debuffs received by 30s
Valley Awakening
Combat & MarchIncreases Hero DMG by 15% for 60s. CD: 300s
Crystal Resonance
Gathering & EconomyTemporarily increases Crystal Cluster Gathering Speed by 50% for 60s. CD: 300s
❓ FAQ — Frequently Asked Questions
What is the best F2P team in Last Asylum: Plague?
The canonical F2P squad is Arthur, Daskal, Marlena, Harper, Claire (all Warriors — mono-faction gives +20% HP/ATK/DEF). Arthur is free from day 1; the $1 Marlena top-up is considered the best value in the game. Daskal arrives in the first Era of Revival season (day 120+).
What should I upgrade first?
Sanctuary first, always — it gates every other building and your hero level cap. Then Training Grounds, Barracks, Research Lab, Infirmary, Wall. Keep the Builder’s Hut at Sanctuary level until Sanctuary 15 for free construction speedups.
When does Marlena unlock?
Day 66 for free — or immediately via the $1 starter top-up. Save UR shards so she lands at 8★ right away, then push 10★.
How do I get Cynthia as F2P?
Cynthia arrives via the Wishing Wheel on day 8. Save diamonds from day 1 (skip everything else) — ~11,500 diamonds total, and always spin ×10 (single spins waste tokens).
How do I get antitoxin?
Antitoxin Workshop + Stable production, every building upgrade completion, Falcon Quests (nearly all of them), Covert Ops and Caravan Trade (including plundering others’ ops — up to 5/day), and Blight/Elite Blight hunts (10/20 stamina). Events pay large amounts.
Why did my plunder income drop to almost nothing?
You hit the daily plunder limit: below the limit 100%, from 1× the limit you keep only 15%, from 1.3× only 5%. It resets at 02:00 UTC. The limit scales with Sanctuary level (2.5M at Lv.10–12 up to 30M at Lv.30) and rises immediately when you upgrade Sanctuary. A yellow triangle under your Might shows the status.
What should I buy in the shops?
Sanctuary/Expedition/Alliance shops: Crow Essence and UR Hero Omnifragments first. Honor shop is for gear blueprints only (never epigraph chests there). All shops restock Monday.
Are diamonds worth spending on speedups?
Only the VIP-shop 8h speedups are considered acceptable purchases — and only after hero resources. Community rule: never dump diamonds into speedups over hero wheel events (Cynthia day 8, Joker after day 15).
What faction should I build?
Warriors are the best early game (free Arthur/Harper shards, $1 Marlena). Rangers peak mid game (counter Warriors). Warlocks are the best late game but need heavy long-term investment. Mono-faction (5 heroes of one type) is the current meta because UR epigraphs buff a single faction.
How does Claire SSR→UR conversion work?
Opens on Era Day 8. She lands at 6★ and the run to 10★ costs 1,600 SSR shards (each substage costs 2× the SSR price). There’s a team-buff dip between 6★–9★ — skip it by banking Hall of Honor levels before converting (Lv.60→8★, Lv.100→9★, Lv.160→instant 10★).
How do I redeem gift codes?
In-game: Avatar (top-left) → Settings → Gift Code. iOS or web: log in at the official redemption page with your linked Facebook/Google account, pick server and character, enter the code.
What are the biggest beginner mistakes?
Upgrading everything equally instead of one main squad; judging heroes before high stars (Marlena is the classic late bloomer); splitting Awakening materials across heroes; wasting gems on VIP levels over hero wheels; skipping daily plunder (~27M resources/day); letting stamina cap.
📖 Read next
Did this guide help?