غزو الوادي: استراتيجية المسارات
معركة التتابع ذات المسارات الثلاثة حيث تتفوق قدرة الاستمرار على القوة البحتة: قواعد التتابع، الحد الأقصى للـ 3 معارك، استراتيجية أولوية المسارات، الأخطاء المعروفة، ولماذا يُعد هذا أفضل حدث خالٍ من المخاطر في اللعبة.
☰ في هذه الصفحة 12 ▾
🗓 محدّث: 2026-09-03
غزو الوادي هو معركة المسارات للتحالف: ثلاثة مسارات، والتحالف الذي يفوز بـ مسارين من أصل 3 يحسم الماتش لصالحه. لكن نظام اللعب هو عبارة عن تتابع (Relay) — حيث يقاتل اللاعبون الأضعف أولاً، ويبقى اللاعب في المسار حتى يتم هزيمته. إن فهم تأثير هذا التتابع على استراتيجية التشكيلة هو جوهر الحدث بأكمله.
يغطي هذا الدليل قواعد التتابع، وهيكل المكافآت، واستراتيجية أولوية المسارات مع متغيراتها الرئيسية، والأخطاء المعروفة، ولماذا يُعد هذا الحدث الأكثر أماناً في اللعبة.
قواعد التتابع
- الأضعف يقاتل أولاً. يبدأ كل مسار بلاعبي القوة القتالية (CP) الأقل فيه ويتصاعد تدريجياً نحو الأعلى فقط عندما يتم هزيمة شخص ما.
- يبقى اللاعب حتى يخسر، ثم يدخل الذي يليه. يحتفظ اللاعب الفائز بالمسار ويستمر في قتال المنافس التالي — لا يوجد تبديل أو تدوير بعد الفوز.
- الحد الأقصى 3 معارك لكل لاعب. بعد ثلاث معارك، تنتهي مهمتك في تلك المواجهة.
- 15 لاعباً لكل مسار. يقسم التحالف قائمته على المسارات الثلاثة.
نتيجة التتابع: إذا فاز جانبك في كل معركة بمعدل قتيلين لكل منهما، فلن يقاتل سوى 8 من أصل 15 لاعباً في المسار. سبعة لاعبين يجلسون طوال المعركة دون خوض أي قتال. هذه الحقيقة تحرك كل قرار يتعلق بالتشكيلة أدناه.
المكافآت وفئة الـ 3 قتلى
- مكافأة الـ 3 قتلى مقيدة بالمستوى (tier-gated) —تحتاج إلى أن تكون معاركك الثلاث كلها عبارة عن قتلى لتصل إلى الفئة الشخصية العليا.
- نظراً لأن اللاعبين الأقوياء في عمق المسار يواجهون خصوماً أقوى، فإن فئة الـ 3 قتلى عادة ما تكون من نصيب قمة القائمة — لذا خطط لتوقعاتك الشخصية بناءً على ذلك.
الجولات والمجموعات
- بعد كل 5 جولات تنتهي المعركة وتبدأ من جديد من التسجيل. أعد التسجيل في كل دورة.
- الفوز ينقلك إلى مجموعة عليا؛ والخسارة تبقيك في نفس المجموعة أو تنزلك إلى مجموعة أضعف. يقوم السلم بترتيب التحالفات ذاتياً بمرور الوقت.
- قد يحدث “تخلف عن اللعب” (bye) حتى مع اكتمال الـ 15 لاعباً — العدد الفردي للمسارات المسجلة يعني أن شخصاً ما سيتقدم دون قتال. إنها مسألة حظ لا أكثر، وليست خطأ برمجياً (bug).
الأخطاء المعروفة
- الاستبدال بعد انتصارين دون خسارة — يجب أن يبقيك نظام التتابع داخله بعد الانتصارات، لكن بعض اللاعبين يتم سحبهم بعد انتصارين. قم بالإبلاغ عن ذلك إذا حدث معك.
- استبعاد اللاعبين المسجلين من الجولة 2. يمكن للتسجيلات القديمة أن تتركك خارج الجولة التالية. الإزالة من القائمة هي للرتبة R4/R5 فقط — إذا كنت عالقاً، اطلب من القيادة إخلاءك لكي تتمكن من إعادة التسجيل.
استراتيجية أولوية المسارات
لست بحاجة للفوز في كل معركة — أنت بحاجة إلى المسارات الصحيحة.
الإعداد المتفق عليه
- أعطِ الأولوية لمسارين من أصل 3. الفوز بالمباراة يتطلب مسارين، وليس 3 — توزيع أعضاء القائمة بالتساوي على الثلاثة يضمن فقط خسارة المسار الثالث على أي حال.
- اقسم أفضل 30 لاعباً بالتساوي على مسارين قويين، وضع الباقين في المسار الثالث.
التعديل المتقدم: أقوى لاعبين إلى المسار الضعيف
- أرسل أقوى لاعبين اثنين إلى المسار الثالث الضعيف — فهما من سيحملانه.
- المنطق هنا يعتمد على حسابات التتابع: لاعبك الأقوياء المتمركزون في المسارات القوية غالباً لا يقاتلون أبداً، لأن اللاعبين الأضعف في المسار يحققون الفوز قبل أن تكون هناك حاجة للأبطال الأساسيين. أما في المسار الضعيف، فهما الفارق بين نتيجة 0-1 ومسار حي.
النقيض الذي أثبت نجاحه
- 3 فرق متوازنة مع وجود أفضل 3 لاعبين في كل فريق وقد ثبت نجاحها أيضاً — مرساة (anchor) لكل مسار بدلاً من التنازل عن مسار كامل.
لا يوجد إعداد خاطئ في الفراغ. القراءة الصحيحة هي: تحقق من الفائز والخاسر وأين في الجولة التالية. خصومك يتغيرون مجموعة تلو الأخرى، وإعداد المسار الذي فاز في هذه المعركة قد يحتاج إلى إعادة توازن في الجولة التالية. تكيّف ولا تعتمد على القيادة الآلية.
لماذا يُعد هذا أفضل حدث خالٍ من المخاطر
غزو الوادي ليس فيه خسارة للقوات، ولا مخاطر على الموارد، ولا تكلفة حقيقية لقوة التحمل (stamina) — على عكس KvK، حيث تحترق المدينة غير المحمية. أنت تققات بقوة بطولة مستعارة، ويبقى جيشك الحقيقي في المنزل سليماً. هذا ما يجعله أحد أفضل الأحداث للحصول على مكافآت آمنة في اللعبة: احضر، سجل، خض معاركك الثلاث، واجمع مكافآتك.
التكلفة الحقيقية الوحيدة هي الانتباه للتشكيلة — وقواعد التتابع المذكورة أعلاه هي كل ما تحتاجه في ميتا التشكيلات.
📊 جداول النقاط والمكافآت
القيم التي تم التحقق منها من بيانات عميل اللعبة (v1.0.87)، المصدر: wiki-last-asylum.com. القيم الأساسية تظهر بدون مكافآت الأكاديمية أو أبحاث الحدث.
المصدر: wiki — flag-war
Last Asylum: Plague Wiki
| الدوري | الأوسمة المطلوبة | حجم الفريق | الفوز | تعادل | خسارة |
|---|---|---|---|---|---|
| الدوري المبتدئ (Rookie League) | 0-499 | 15 | 200 | 60 | 60 |
| دوري المستجدين (Novice League) | 500-1,499 | 15 | 250 | 75 | 75 |
| دوري المتدربين (Beginner League) | 1,500-2,799 | 15 | 400 | 120 | 120 |
| الدوري النخبوي (Elite League) | 2,800-4,499 | 20 | 600 | 180 | 180 |
| الدوري الملحمي (Epic League) | 4,500-6,999 | 20 | 800 | 240 | 240 |
| الدوري الأسطوري (Mythic League) | 7,000+ | 20 | 1,000 | 300 | 300 |
🎥 أدلة الفيديو
أدلة فيديو مختارة وتحليلات استراتيجية من صناع المحتوى في المجتمع
📝 نص الحوار 8:50 (530 сек) ▼
ابحث في YouTube عن هذا الموضوع: «Canyon Conquest»
استعلام البحث: Last Asylum Plague Canyon Conquest lane strategy
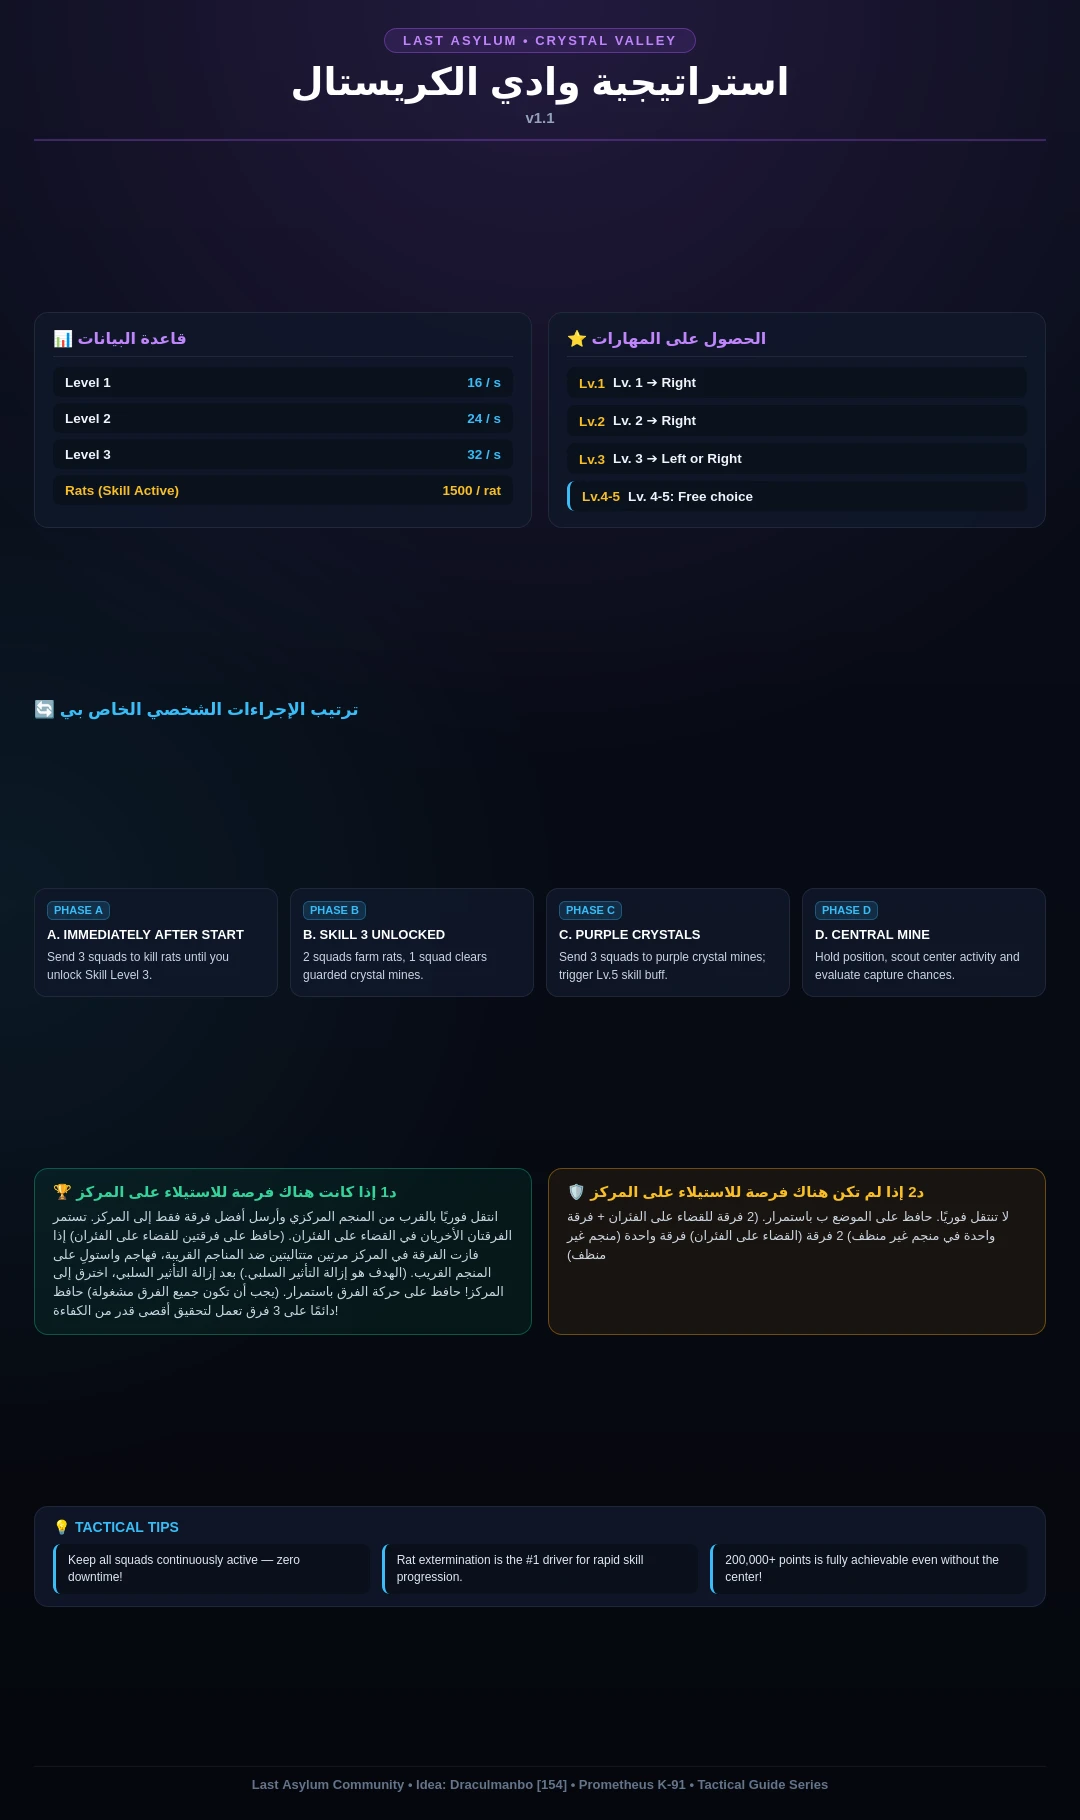
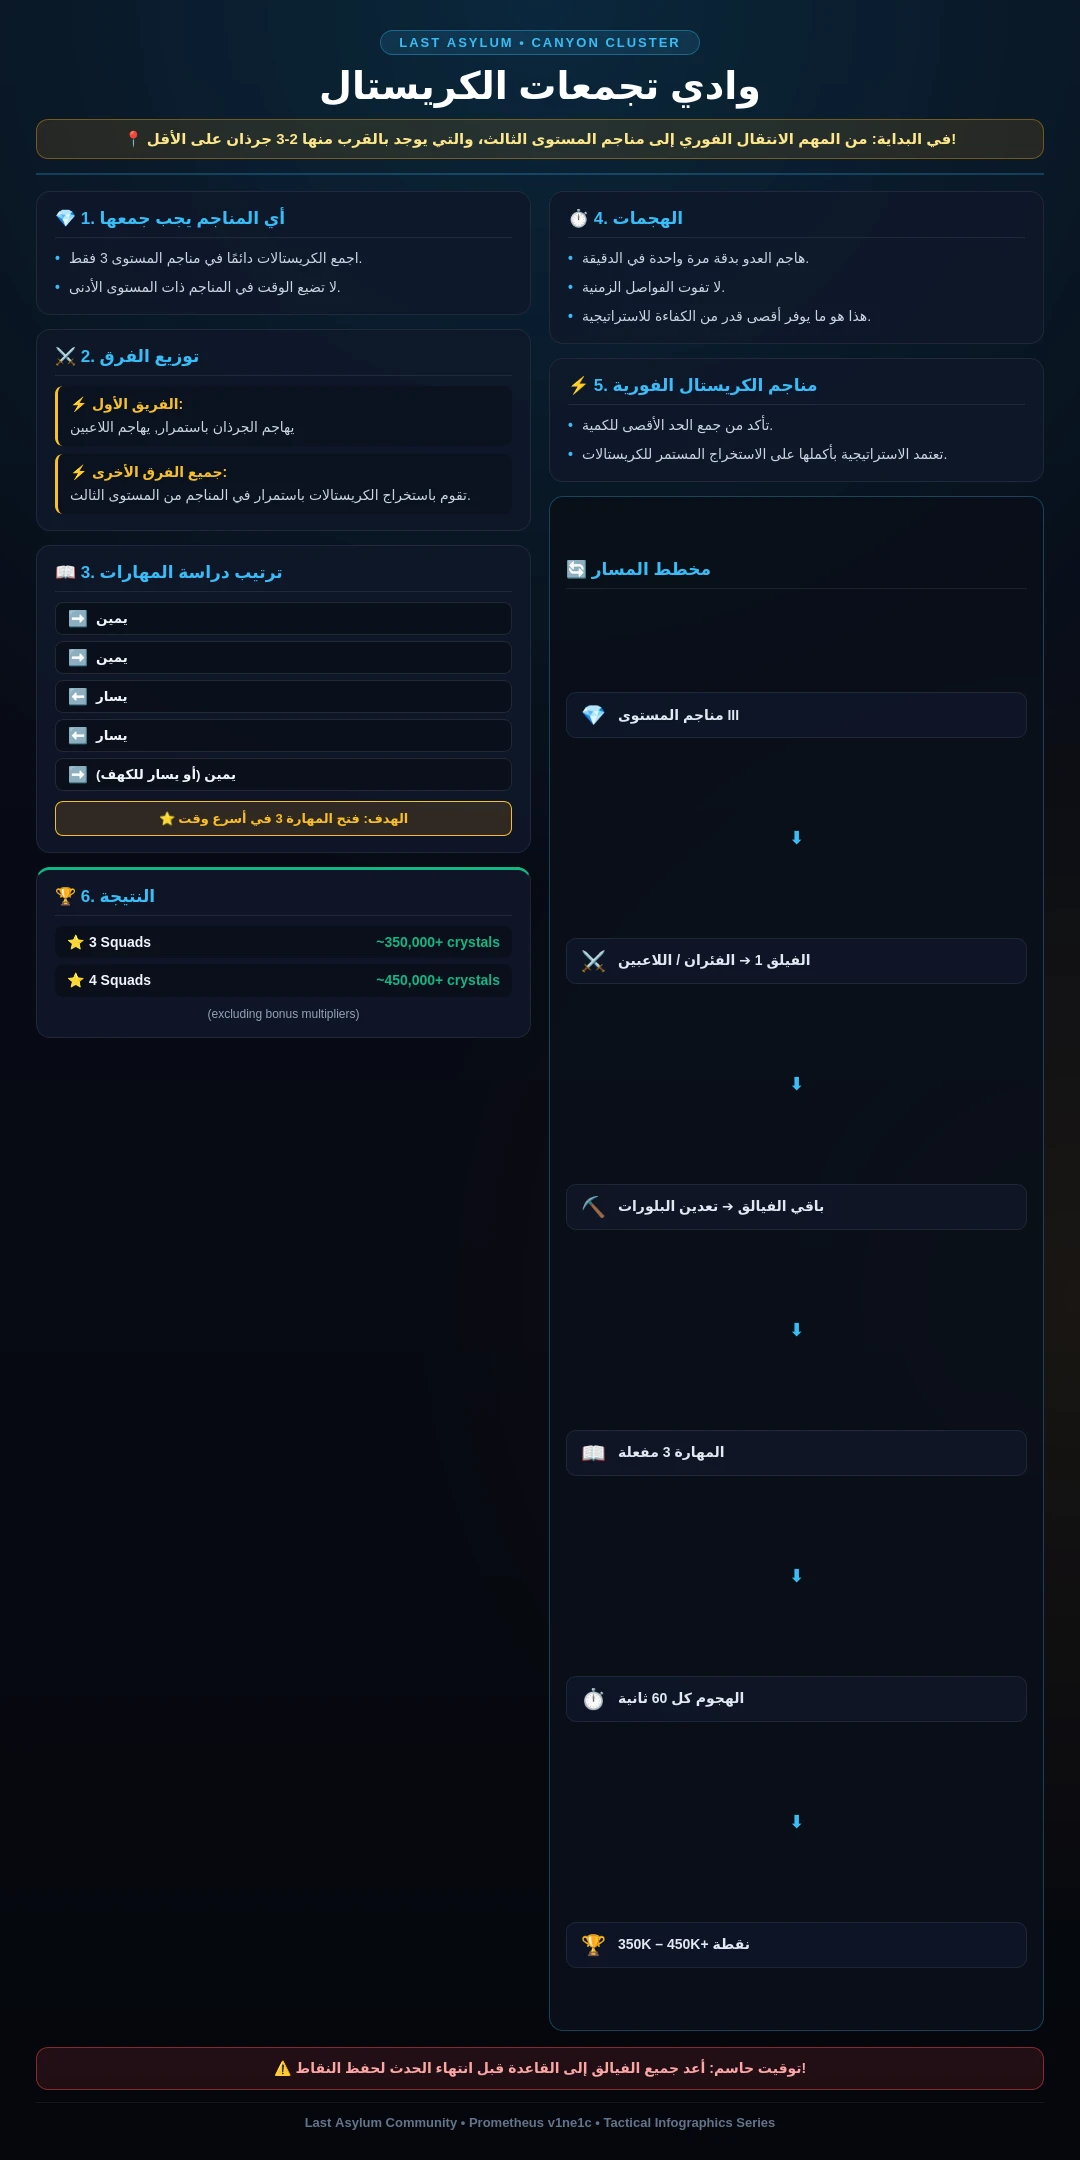
💎 Crystal Valley: Tactical Buffs & Skills
المهارات الرسمية ومزايا الجمع الخاصة بـ Crystal Mine / Valley. حسّن إنتاجيتك وتفوقك القتالي.
طفرة الكريستال
الجمع والاقتصاداحصل بشكل دوري على 1080 كريستالة نقية
صائد جرذان الطاعون
الجمع والاقتصاداحصل على 1500 كريستالة إضافية عندما تقضي على جرذ طاعون
توسيع القوة
القتال والمسيرسعة مسير البطل الفردي +50
المسير السريع
القتال والمسيرسرعة مسير القوات في وادي عناقيد الكريستال +25%
غنائم الوادي
الجمع والاقتصاداحصل على 5000 كريستالة نقية إضافية عند الاستيلاء على عرق. فترة الهدوء: 60 ثانية
يقظة الوادي
الجمع والاقتصاداحصل على 5000 كريستالة نقية إضافية عند الفشل في الاستيلاء على عرق. فترة الهدوء: 60 ثانية
تعدين الكريستال
الجمع والاقتصادتزداد سرعة جمع عناقيد الكريستال بنسبة 15%
إرادة حديدية
القتال والمسيرتقلل مدة التأثيرات السلبية المستلمة بمقدار 30 ثانية
صحوة الوادي
القتال والمسيرتزيد ضرر البطل بنسبة 15% لمدة 60 ثانية. فترة الهدوء: 300 ثانية
رنين الكريستال
الجمع والاقتصادتزيد مؤقتًا سرعة جمع عناقيد الكريستال بنسبة 50% لمدة 60 ثانية. فترة الهدوء: 300 ثانية
❓ الأسئلة الشائعة
ما هو أفضل فريق F2P في Last Asylum: Plague؟
الفريق القياسي لـ F2P هو Arthur و Daskal و Marlena و Harper و Claire (جميعهم من فئة Warriors — التشكيلة أحادية الفصيل تمنح +20% HP/ATK/DEF). Arthur متاح مجاناً من اليوم الأول؛ وتعتبر حزمة Marlena بقيمة 1 دولار أفضل قيمة في اللعبة. يصل Daskal في أول موسم من Era of Revival (بعد اليوم 120).
ما الذي يجب علي ترقيته أولاً؟
الملاذ (Sanctuary) أولاً دائماً — فهو يحدد مستوى جميع المباني الأخرى والحد الأقصى لمستوى أبطالك. ثم ساحات التدريب (Training Grounds)، والثكنات (Barracks)، ومختبر الأبحاث (Research Lab)، والمستشفى (Infirmary)، والجدار (Wall). حافظ على كوخ البناء (Builder’s Hut) عند مستوى الملاذ حتى يصل الملاذ إلى المستوى 15 للحصول على تسريع بناء مجاني.
متى يتم فتح Marlena؟
في اليوم 66 مجاناً — أو فوراً عبر حزمة المبتدئين بقيمة 1 دولار. وفر شظايا UR لتصل بها إلى 8★ فوراً، ثم ادفع بها إلى 10★.
كيف أحصل على Cynthia كلاعب F2P؟
تصل Cynthia عبر عجلة الحظ (Wishing Wheel) في اليوم 8. وفر الماس من اليوم الأول (تجاهل أي شيء آخر) — تحتاج حوالي 11,500 ماسة إجمالاً، وقم دائماً بالتدوير ×10 (التدوير الفردي يهدر الرموز).
كيف أحصل على مضاد السموم (Antitoxin)؟
عبر ورشة مضاد السموم (Antitoxin Workshop) + إنتاج الإسطبل، وإكمال ترقية كل مبنى، ومهام الصقر (Falcon Quests) (تقريباً كلها)، والعمليات السرية (Covert Ops) وتجارة القوافل (Caravan Trade) (بما في ذلك نهب عمليات الآخرين — حتى 5 مرات يومياً)، وصيد Blight/Elite Blight (10/20 طاقة). الفعاليات تمنح كميات كبيرة.
لماذا انخفض دخل النهب الخاص بي إلى لا شيء تقريباً؟
لقد وصلت إلى حد النهب اليومي: تحت الحد 100%، من 1× الحد تحتفظ بـ 15% فقط، ومن 1.3× تحتفظ بـ 5% فقط. يتم إعادة التعيين في الساعة 02:00 بالتوقيت العالمي (UTC). يتناسب الحد مع مستوى الملاذ (2.5 مليون في المستوى 10-12 وصولاً إلى 30 مليون في المستوى 30) ويرتفع فوراً عند ترقية الملاذ. يظهر مثلث أصفر تحت قوتك (Might) يوضح الحالة.
ما الذي يجب أن أشتريه من المتاجر؟
متاجر الملاذ/الاستكشاف/التحالف: جوهر الغراب (Crow Essence) وشظايا بطل UR الشاملة (UR Hero Omnifragments) أولاً. متجر الشرف (Honor shop) مخصص لمخططات المعدات فقط (لا تشترِ صناديق النقوش أبداً من هناك). يتم تحديث جميع المتاجر يوم الاثنين.
هل يستحق الماس الإنفاق على التسريعات؟
فقط تسريعات 8 ساعات من متجر VIP تعتبر مشتريات مقبولة — وفقط بعد موارد الأبطال. قاعدة المجتمع: لا تنفق الماس أبداً على التسريعات بدلاً من فعاليات عجلة الأبطال (Cynthia في اليوم 8، Joker بعد اليوم 15).
أي فصيل يجب أن أبني؟
المحاربون (Warriors) هم الأفضل في بداية اللعبة (شظايا Arthur/Harper المجانية، Marlena بـ 1 دولار). الرماة (Rangers) يصلون لذروتهم في منتصف اللعبة (لمواجهة المحاربين). السحرة (Warlocks) هم الأفضل في نهاية اللعبة لكنهم يحتاجون لاستثمار طويل الأمد. التشكيلة أحادية الفصيل (5 أبطال من نفس النوع) هي الميتا الحالية لأن نقوش UR تعزز فصيلاً واحداً.
كيف يعمل تحويل Claire من SSR إلى UR؟
يفتح في اليوم 8 من الحقبة. تبدأ عند 6★ وتكلفة الوصول إلى 10★ هي 1,600 شظية SSR (كل مرحلة فرعية تكلف ضعف سعر SSR). هناك انخفاض في تعزيز الفريق بين 6★-9★ — تجنبه عن طريق تخزين مستويات قاعة الشرف (Hall of Honor) قبل التحويل (المستوى 60←8★، المستوى 100←9★، المستوى 160←10★ فوراً).
كيف أقوم باسترداد رموز الهدايا؟
داخل اللعبة: الصورة الرمزية (أعلى اليسار) ← الإعدادات ← رمز الهدية (Gift Code). iOS أو الويب: سجل الدخول في صفحة الاسترداد الرسمية باستخدام حساب Facebook/Google المرتبط، اختر الخادم والشخصية، وأدخل الرمز.
ما هي أكبر أخطاء المبتدئين؟
ترقية كل شيء بالتساوي بدلاً من التركيز على فريق رئيسي واحد؛ الحكم على الأبطال قبل الوصول لنجوم عالية (Marlena هي البطلة الكلاسيكية التي تتألق متأخراً)؛ تقسيم مواد الصحوة (Awakening) على عدة أبطال؛ إهدار الجواهر على مستويات VIP بدلاً من عجلات الأبطال؛ تخطي النهب اليومي (~27 مليون مورد/يوم)؛ السماح للطاقة بالوصول للحد الأقصى.
📖 اقرأ التالي
هل ساعدك هذا الدليل؟