Kristalkluster Vallei: F2P Punt-Landingsroute
Kristalkluster Vallei evenementgids: rode mobs farmen (elk 1,5K punten), mijnovernames voor 5K punten/min, vaardigheidstiming en de stopwatch-truc voor de maximale puntenopbrengst.
☰ Op deze pagina 15 ▾
🗓 Bijgewerkt: 2026-10-12
Kristalkluster Vallei is een getimed battle-royale-achtig evenement: je brengt een vaste sessie door op een gedeelde kaart om rode neutrale mobs te verslaan en kristallen te mijnen, waarbij je score — niet het doden van andere spelers — je beloningscategorie bepaalt. F2P’ers en betalende spelers (whales) beginnen op gelijke hoogte; discipline wint van de portemonnee.
De Wiskunde van het Scorebord
Drie puntenbronnen zijn belangrijk:
| Bron | Punten | Waarom het belangrijk is |
|---|---|---|
| Rode neutrale mobs (“roden”) | ~1.500 elk | Direct, herhaalbaar en dicht respawnend. De ruggengraat van elke F2P-run. |
| Kristalmijnen (aanvallen van door spelers bezette Kristalnodes) | ~5.000 per minuut dat je het bezit | Explosief als je de bezetting kunt volhouden; riskant als je te ver doorstoot. |
| Persoonlijke vaardigheidsontgrendelingen / uitrustingsboosts | multiplicatief | Passieve versterkers voor al het bovenstaande. |
Verzamel roden vroeg, schakel over op mijnen zodra je vaardigheden hoog zijn, en je scoort hoger dan de meeste casual whales.
De F2P-route
- Verken eerst de kaart. Voordat je iets aanvalt, zoom je uit en zoek je de dichtstbijzijnde cluster rode mobs bij je spawn. De juiste startlocatie bespaart elke cyclus 5 minuten aan maarttijd.
- Boerderij roden meedogenloos voor ~1.500 pt per kill. Groepeer ze: parkeer je mars zodat elke kill overgaat in de volgende met vrijwel nul reistijd. De regel van Korpez: als de marsbalk ooit stationair staat, heb je de verkeerde plek gekozen.
- Ontgrendel je vaardighedenboom onmiddellijk. Het vaardigheidspaneel van het Crystal-evenement opent aan de zijkant van het scherm — stop punten in bonussen voor rode kills, dan bewegingssnelheid en daarna mijnbonussen. Wacht niet; elke minuut vertraging is verloren vermenigvuldigingstijd.
- Gebruik een stopwatch / timerep voor mijnvensters. Het aanvallen van een bezette mijn levert ~5K op per minuut dat je hem bezit; stel vooraf een timer in voor de uitbetalingstics zodat je mijnen kunt pakken op het moment dat je tegenstanders ervan wegdraaien.
- Betwist pas daarna mijnen. Zodra je roden zijn opgeruimd of je vaardigheden maximaal zijn, spring je midden in de cyclus op een betwiste mijn — idealiter een waarvan de eigenaar net is vertrokken naar een ander rood pakket.
Disciplineregels
- Nooit inactief. Vijfentwintig minuten continue roden > 35 minuten ronddwalen.
- Vecht niet vroeg met spelers. PvP-duels voeden punten aan je tegenstander en vertragen je runs voor groene scores. Verleg je focus; kom later terug.
- Ga niet in je eentje achter een betwiste mijn aan. Je investeert 60s en krijgt 5K — ondertussen hadden drie rode kills 4,5K per 90s opgeleverd met nul risico. Houd mijnen alleen vast als ze onbetwist of zwaar bezet zijn.
- Vaardigheden zijn niet optioneel. De vaardigheidspunten farmen zichzelf niet — open dat paneel zodra je het ziet.
De Tegenstand tegen Whales
Betalende spelers kopen voornamelijk mars-snelheidspakketten en snellere, sterkere vaardigheden. Het antwoord is niet om te wedijveren met hun snelheid — het is om ze te overtreffen in discipline: meer roden per minuut raken, nooit een seconde verspillen aan gevechten met hen, en de mijn stelen die ze net hebben vrijgemaakt zodra ze vertrekken. De meeste whales bereiken een plateau bij 5K-mijnen; een schone F2P-run van 30 roden per minuut belandt in dezelfde categorie.
📊 Score- en Beloningstabellen
Geverifieerde waarden uit game-clientgegevens (v1.0.87), bron: wiki-last-asylum.com. Basiswaarden weergegeven zonder Academie- of evenementonderzoeksbonussen.
Bron: wiki — black-mine
Aderen
| Ader | Voorraad | Tarief |
|---|---|---|
| Crystal Cluster 1 | 8.640 | 12 |
| Crystal Cluster 2 | 17.280 | 24 |
| Crystal Cluster 3 | 34.560 | 48 |
| Instant Cluster 4 | 4.000 | 200 |
Mijnvaardigheden
| Vaardigheid | Effect | Kosten |
|---|---|---|
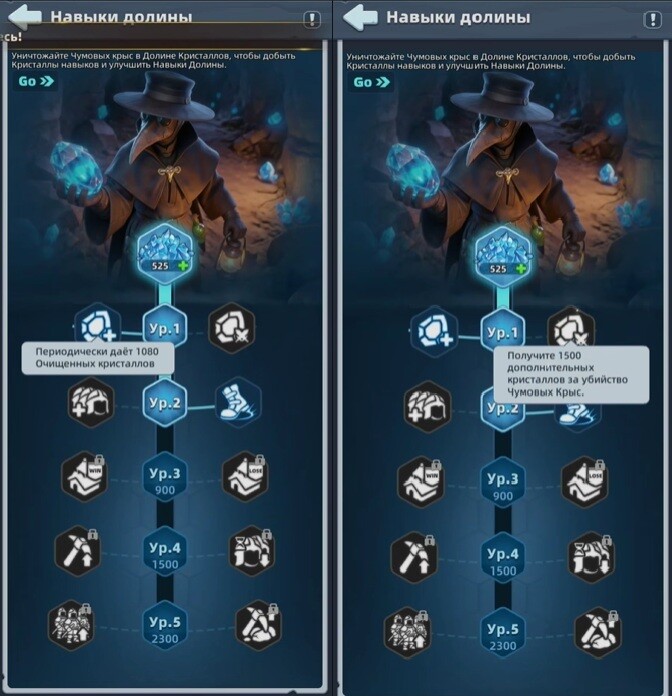
| Crystal Surge | Ontvang periodiek 1080 Gezuiverde Kristallen | 200 |
| Plaagrat Hunter | Ontvang 1500 extra Kristallen wanneer je een Pestrat verslaat | 200 |
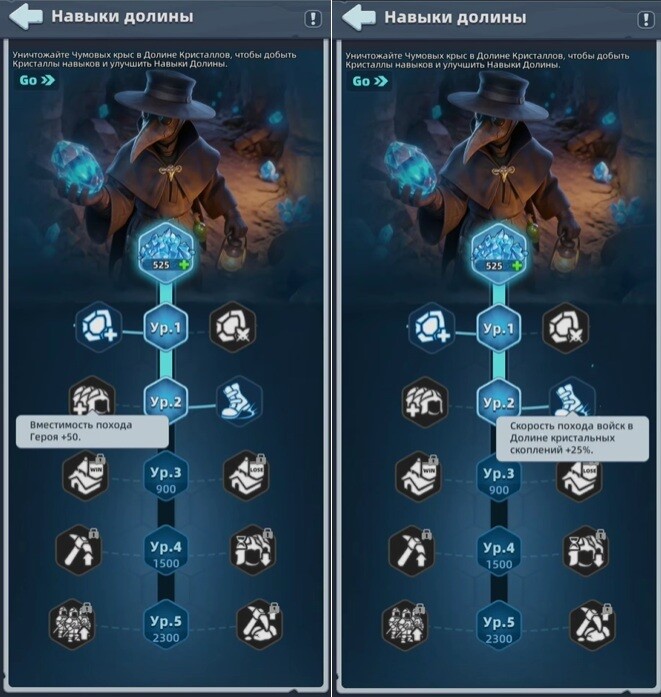
| Force Expansion | Capaciteit van Maart met Enkele Held +50 | 500 |
| Swift March | Troepenmars-snelheid in Kristalkluster Vallei +25% | 500 |
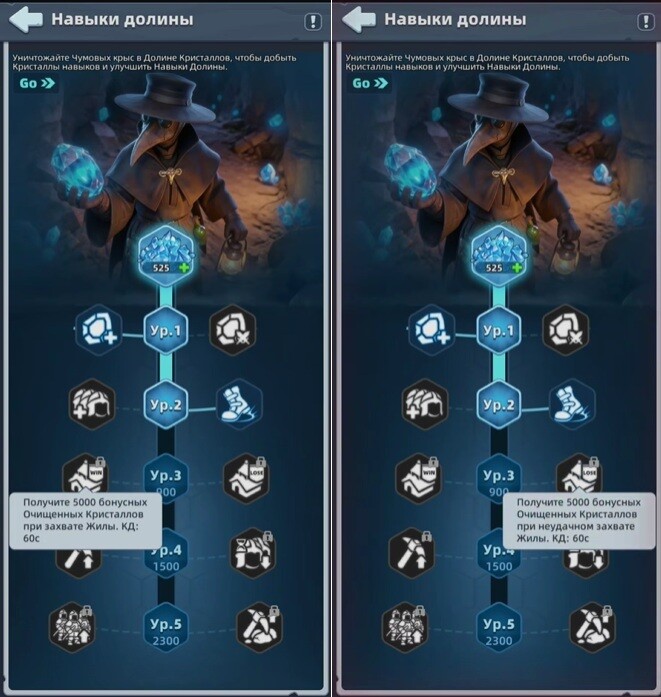
| Valley Plunder | Ontvang 5000 extra Gezuiverde Kristallen wanneer je een Ader verovert. CD: 60s | 900 |
| Valley Vigil | Ontvang 5000 extra Gezuiverde Kristallen als het niet lukt om een Ader te veroveren. CD: 60s | 900 |
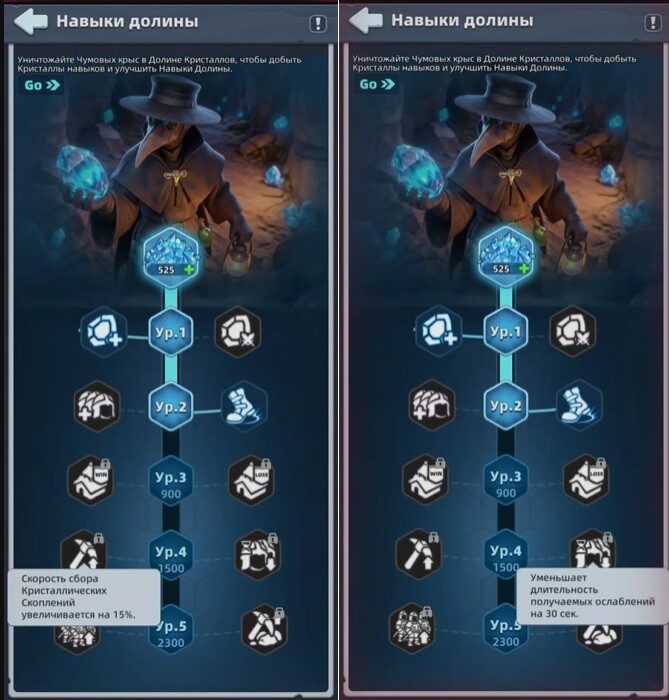
| Crystal Mining | Verzwaarsnelheid van Crystal Cluster verhoogt met 15% | 1.500 |
| Iron Will | Vermindert de duur van ontvangen debuffs met 30s | 1.500 |
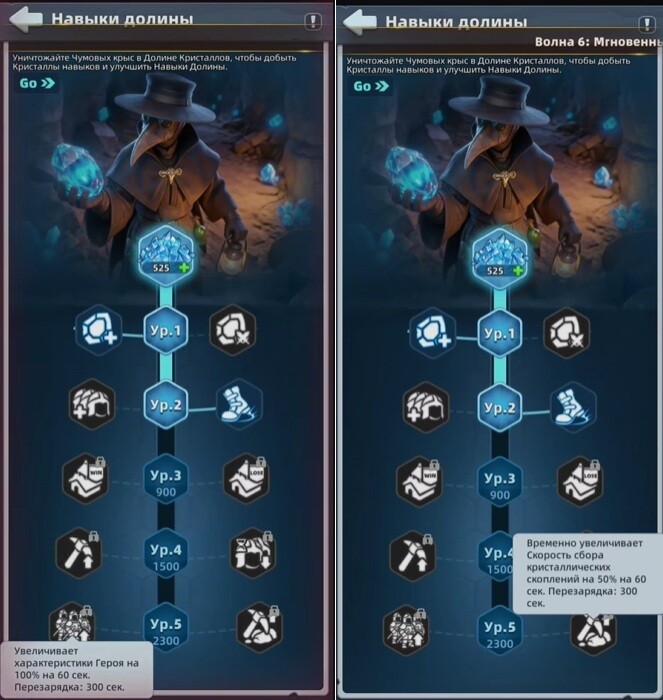
| Valley Awakening | Verhoogt Helden-SCHADE met 15% gedurende 60s. CD: 300s | 2.300 |
| Crystal Resonance | Verhoogt tijdelijk de verzamelsnelheid van Crystal Cluster met 50% gedurende 60s. CD: 300s | 2.300 |
Uitgebreide Gids voor Crystal Valley: Timing, Teleporteren en Vaardigheidskeuzes
Solowedstrijd van 30 minuten op een afzonderlijke kaart: verzamel kristallen, behoud tegels, versla ratten en upgrade tijdelijke vaardigheden. Onoplettendheid wordt snel afgestraft — een slechte startpositie, een te lange mars of een gemist venster voor onmiddellijke kristallen bezorgt punten aan alle anderen. Sterkte helpt bij de troon en tier-3-tegels, maar een gemiddelde speler met een stabiele farm haalt regelmatig een higher score dan een afgeleide ‘whale’.
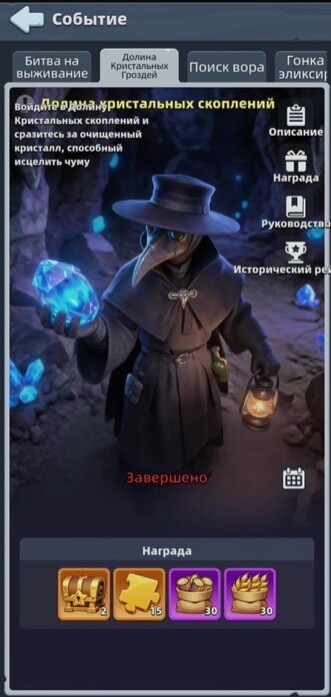
Formaat en legerregels
- Solo-evenement, geen alliantie. Je concurreert zelfs tegen je eigen clanleden in de vallei. Saboteer bondgenoten niet, maar verwacht niet dat iemand tegels afstaat.
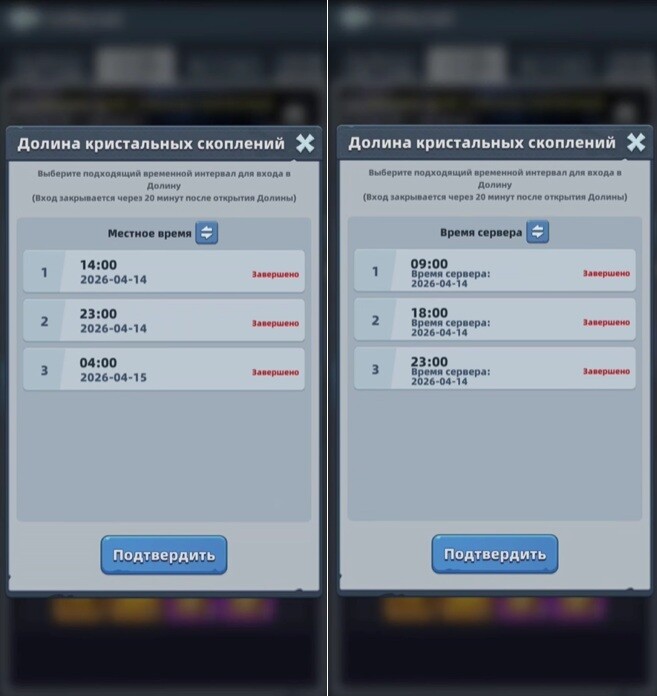
- 30 minuten, drie tijdsloten, één poging. Je kunt slechts aan één van de slots deelnemen — let goed op de kalender zodat je het niet mist. Alleen voor oudere servers; als jouw server nog geen vallei heeft, heeft deze het stadium nog niet bereikt.
- Troepen volgen de evenementregels. Het aantal eenheden schaalt met de kazernecapaciteit, de tier is je hoogst ontgrendelde. Verliezen blijven binnen het evenement en hebben geen invloed op je permanente leger.
- Genezen kost alleen versnellingen (genezing of universeel). Constant vechten put dezelfde versnellingen uit die je basis en onderzoek nodig hebben — F2P moet zinloze gevechten vermijden.
- Geen aanvallen op steden. Gevechten zijn uitsluitend voor grondstoftegels: stoot de houder weg, neem de plek over en verzamel.
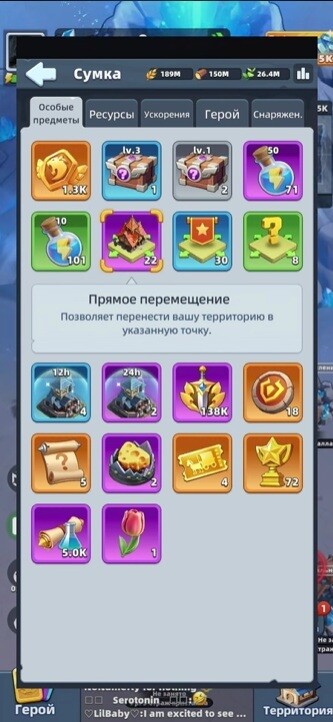
Eerste 2 minuten en teleporters
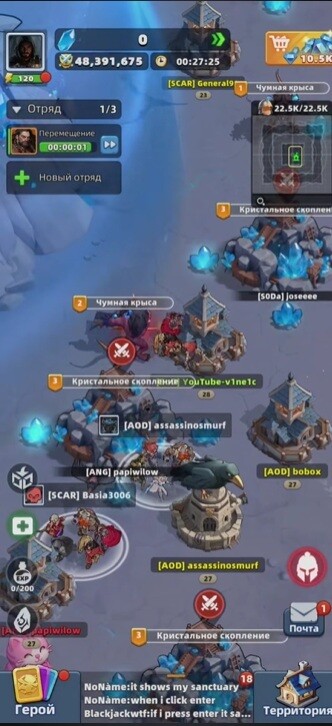
Na binnenkomst krijg je 2 minuten voorbereiding op een willekeurige spawn. Controleer voordat je beweegt: tier-2-tegels in de buurt, ratten die dichtbij spawnen, geen cluster van sterke spelers, korte marsafstanden, ruimte om te manœuvreren. De klassieke fout is om direct naar het centrum te springen — spelers buiten de meta worden eruit gegooid en brengen de ronde door met marcheren in plaats van te farmen.

- Gratis teleporteren vernieuwt elke 6 minuten. Gebruik het wanneer de plek doodloopt (sterke buren, betwiste tegels, geen ratten, constante aanvallen).
- Betaalde teleporters escaleren: 1, 2, 3, 4 en dan 5 per sprong. Spring alleen naar een concreet doel (vrije zone met goede tegels en ratten), nooit op basis van “het voelt daar beter” — iedereen farmed terwijl jij vliegt.
Tegels en de troon
| Tegel | Opbrengst | Voor wie |
|---|---|---|
| Tier 1 | laagste, rustig | leren van het evenement, runs zonder gevechten |
| Tier 2 | solide, matige betwisting | standaard voor de meeste niet-whale spelers |
| Tier 3 (bij de troon) | beste tarief, zware betwisting | sterke accounts die dit kunnen behouden |
Als je tier 3 niet kunt vasthouden, levert het minder op dan een rustige tier-2-tegel: bezetten, weggeslagen worden, terugmarcheren, herhalen. Dertig minuten stabiel farmen op tier 2 verslaat dertig minuten dingen willen bewijzen aan de top.
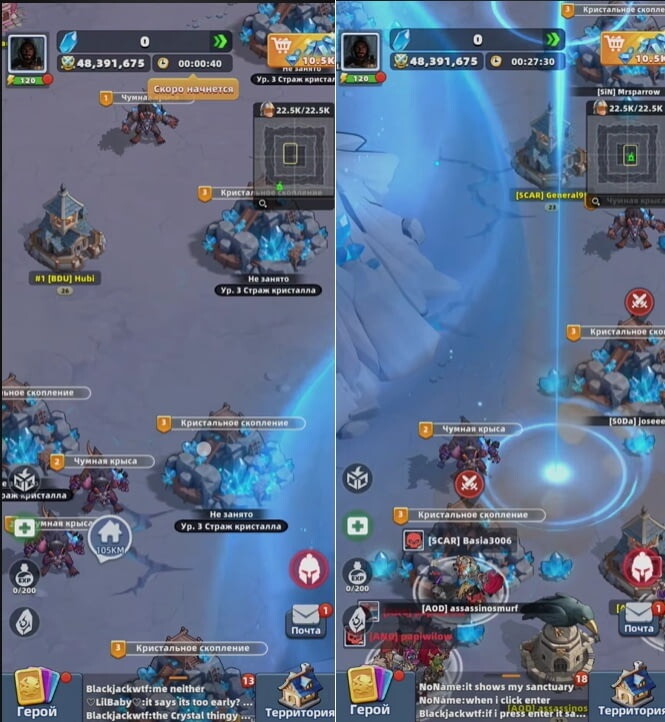
- De troongevechten openen 23 minuten na de start en duren 7 minuten. Voor sterke accounts met een leger, helden en een honger naar oorlog is dit het logische doel. Voor F2P/lage spendeerders is het geen goed plan: terwijl de topspeler in het midden vechten, worden gewone tegels vaak rustig en farmbaar. De meeste punten komen sowieso voor de troon — tegels, verzamelen, ratten en verspreide kristallen.

Ratten en de vroege splitsing
Het doden van ratten geeft evenement-vaardigheid-XP — hoger rattenniveau, meer XP. Hoe eerder vaardigheden worden ontgrendeld, hoe langer ze renderen. Zet niet elke mars in op verzamelen bij de start: voer met 3 marsen 1 verzamelen + 2 ratten uit; met 4 marsen, 1 verzamelen + 2–3 ratten en reacties. Een 4e mars is hier een echt voordeel. Ratten worden snel weggesnoept, maar ze negeren betekent dat je het grootste deel van het potentieel van het evenement misloopt.
Keuzes in de vaardighedenboom
Tijdelijk voor één run, daarna gereset. Twee takken, vijf niveaus, één keuze per niveau. De eerste vier zijn passief; de 5e is actief met een cooldown van 5 minuten. Kies wat bij jouw speelstijl past, niet het hoogste getal.
- Niveau 1: links — periodiek gratis inkomen van 1.080 kristallen; rechts — 1.500 per gedode rat. Rechts betaalt zich alleen uit bij dichte rattenconcentraties en snelle clears; links is het veilige inkomen wanneer ratten schaars of betwist zijn.
- Niveau 2: links — mars +50 krijgers; rechts — +25% marssnelheid. Snelheid wint meestal: sneller bij ratten, tegels en losse kristallen. Capaciteit lost de echte hulpbron van de vallei nooit op — de klok van 30 minuten.
- Niveau 3: links — 5.000 kristallen per succesvolle tegelovername (maximaal eens per minuut); rechts — 5.000 wanneer je squad wordt weggevaagd op een tegel. Neem voor normaal spelen de overnamebonus; bouw niet rond verliezen, vooral niet wanneer genezen versnellingen kost.
- Niveau 4: links — +15% tegel-verzamelssnelheid; rechts — snellere debuffreiniging op verslagen helden. Verzamelaars kiezen links; troonvechters kiezen rechts.
- Niveau 5 (actief): links — +100% heldenstatistieken gedurende 60s; rechts — +50% tegel verzamelen gedurende 60s. Vechters kiezen links, boeren rechts — en activeer het op een echt moment (voor een gevecht, een belangrijk behoud, een rijke verzameling), niet zomaar op cooldown.
PvP en onmiddellijke kristallen
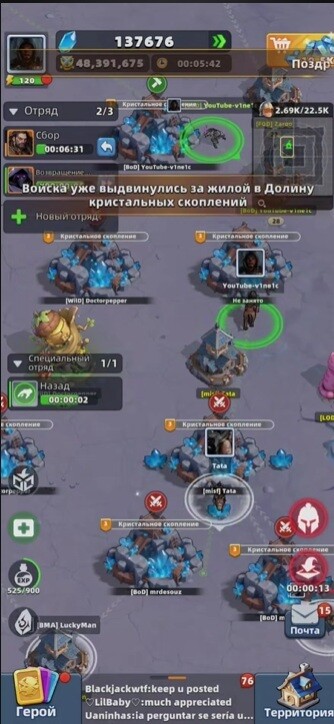
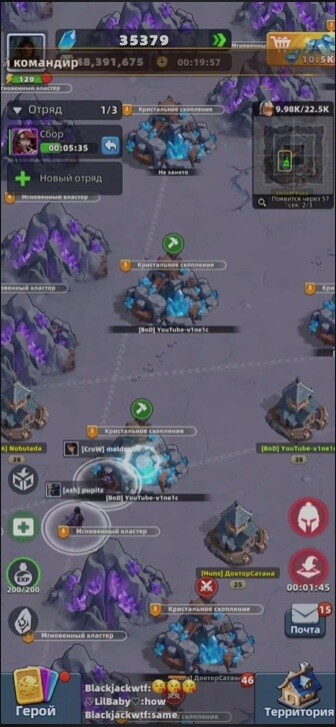
- Geen punten voor het doden van de tegelhouder zelf. Een goede aanval is er een die positie + kristallen oplevert: het slachtoffer laat verzamelde kristallen vallen die rond de tegel verspreid liggen en die jij opraapt, plus je neemt de plek in. Val alleen aan met voordeel (zwakkere houder, langzittende verzamelaar, snelle buit in de buurt). Grijp ook zichtbare losse kristallen in de buurt van tegels van anderen — snelle punten met nagenoeg geen risico.
- Onmiddellijke kristallen spawnen rond minuut 10, 11, 12, 20, 21 en 22. Ze verzamelen snel en betalen goed uit. Houd een deel van je marsen klaar bij die tijdstippen — haal soms een eenheid weg van een normale tegel om ze te betwisten. Beste inhaalsmechanisme voor F2P: geen troongevecht nodig.
Eenvoudig run-plan en waar punten weglekken
Start: verken tijdens de voorbereiding, vermijd het centrum, anker nabij tier-2-tegels met ratten. Na de start: 1 mars verzamelt, de rest jaagt op ratten voor snelle vaardigheidsontgrendeling. Midden: behoud een fatsoenlijke plek, houd elke mars bezig, bereid je voor op 10/11/12, daarna 20/21/22; na minuut 23 blijven spelers die niet voor de troon gaan gewoon farmen. F2P-regels: tier-2-tegels, ratten voor vaardigheden, onmiddellijke vensters, geen willekeurige betaalde teleporters, geen vechtpartijen die versnellingen verbranden. Sterke accounts voegen tier-3-tegels en de troon toe — maar farmen nog steeds, upgraden vaardigheden en benutten onmiddellijke vensters voor minuut 23.
Punten lekken weg door: trage startkeuzes, lange marsen naar verre ratten, gemiste onmiddellijke vensters, gevechten zonder voordeel, willekeurige betaalde teleporters, en vastberaden blijven hangen aan een onhoudbare tegel. Elke actie moet scoren of je positie verbeteren — sla hem anders over.
Bron: Last Asylum: Plague - гайд по Долине кристальных скоплений. Секреты, советы и тактика от новичка до топа. door Гейм-Знаток op DTF.
🎥 Videogidsen
Geselecteerde videogidsen en strategische analyses van community-makers
📝 Teksttranscript 15:28 (928 сек) ▼
Zoek op YouTube naar dit onderwerp: «Crystal Cluster Valley»
Zoekopdracht: Last Asylum Plague Crystal Cluster Valley guide
❓ FAQ — Veelgestelde vragen
Wat is het beste F2P-team in Last Asylum: Plague?
Het canonieke F2P-team is Arthur, Daskal, Marlena, Harper, Claire (allemaal Warriors — mono-factie geeft +20% HP/ATK/DEF). Arthur is vanaf dag 1 gratis; de $1 Marlena-opwaardeeractie wordt beschouwd als de beste waarde in het spel. Daskal arriveert in het eerste Era of Revival-seizoen (dag 120+).
Wat moet ik als eerste upgraden?
Altijd eerst het Sanctuary — het blokkeert elk ander gebouw en je maximale heldenniveau. Daarna Training Grounds, Barracks, Research Lab, Infirmary, Wall. Houd de Builder’s Hut op Sanctuary-niveau tot Sanctuary 15 voor gratis bouwsnelheidsbonussen.
Wanneer wordt Marlena ontgrendeld?
Dag 66 gratis — of direct via de $1 starter-opwaardeeractie. Bewaar UR-scherven zodat ze direct op 8★ landt, en stuur daarna aan op 10★.
Hoe krijg ik Cynthia als F2P?
Cynthia arriveert via het Wishing Wheel op dag 8. Bewaar diamanten vanaf dag 1 (sla al het andere over) — ~11.500 diamanten in totaal, en draai altijd ×10 (enkele spins verspillen tokens).
Hoe krijg ik antitoxine?
Antitoxin Workshop + Stable productie, elke voltooiing van een gebouw-upgrade, Falcon Quests (bijna allemaal), Covert Ops en Caravan Trade (inclusief het plunderen van andermans ops — tot 5/dag), en Blight/Elite Blight-jachten (10/20 stamina). Evenementen leveren grote hoeveelheden op.
Waarom is mijn plunderinkomen tot bijna nul gedaald?
Je hebt de dagelijkse plunderlimiet bereikt: onder de limiet 100%, vanaf 1× de limiet houd je slechts 15% over, vanaf 1,3× slechts 5%. Het reset om 02:00 UTC. De limiet schaalt met het Sanctuary-niveau (2,5M op Lv.10–12 tot 30M op Lv.30) en stijgt direct wanneer je het Sanctuary upgradet. Een gele driehoek onder je Might toont de status.
Wat moet ik kopen in de winkels?
Sanctuary/Expedition/Alliance-winkels: eerst Crow Essence en UR Hero Omnifragments. De Honor-winkel is alleen voor uitrustingsblauwdrukken (koop daar nooit epigraph-kisten). Alle winkels worden op maandag aangevuld.
Is het de moeite waard om diamanten uit te geven aan speedups?
Alleen de 8u speedups uit de VIP-winkel worden als acceptabele aankopen beschouwd — en alleen na heldenbronnen. Gemeenschapsregel: geef nooit diamanten uit aan speedups in plaats van aan heldenwiel-evenementen (Cynthia dag 8, Joker na dag 15).
Welke factie moet ik opbouwen?
Warriors zijn het beste voor het vroege spel (gratis Arthur/Harper-scherven, $1 Marlena). Rangers pieken in het middenspel (counteren Warriors). Warlocks zijn het beste voor het late spel, maar vereisen een zware langetermijninvestering. Mono-factie (5 helden van één type) is de huidige meta omdat UR-epigraphs één factie versterken.
Hoe werkt de Claire SSR→UR conversie?
Opent op Era-dag 8. Ze landt op 6★ en de weg naar 10★ kost 1.600 SSR-scherven (elke subfase kost 2× de SSR-prijs). Er is een dip in team-buffs tussen 6★–9★ — sla dit over door Hall of Honor-niveaus op te sparen voor het converteren (Lv.60→8★, Lv.100→9★, Lv.160→direct 10★).
Hoe wissel ik cadeaucodes in?
In-game: Avatar (linksboven) → Settings → Gift Code. iOS of web: log in op de officiële inwisselpagina met je gekoppelde Facebook/Google-account, kies server en personage, voer de code in.
Wat zijn de grootste beginnersfouten?
Alles gelijkmatig upgraden in plaats van één hoofdteam; helden beoordelen voordat ze hoge sterren hebben (Marlena is de klassieke laatbloeier); Awakening-materialen verdelen over helden; edelstenen verspillen aan VIP-niveaus in plaats van aan heldenwielen; dagelijkse plunder overslaan (~27M grondstoffen/dag); stamina laten vollopen.
📖 Lees verder
Hielp deze gids je?