หุบเขาคริสตัลระยิบระยับ: เส้นทางฟาร์มคะแนนสำหรับสายฟรี (F2P)
คู่มือกิจกรรมหุบเขาคริสตัลระยิบระยับ: การฟาร์มมอนสเตอร์แดง (ตัวละ 1.5K คะแนน), การตีเหมืองที่ 5K คะแนน/นาที, วินัยในการบริหารเวลาสกิล และเทคนิคการใช้ส톱วอทช์เพื่อกวาดคะแนนสูงสุด
☰ ในหน้านี้ 15 ▾
🗓 อัปเดตแล้ว: 2026-10-12
หุบเขาคริสตัลระยิบระยับ (หุบเขาคริสตัล) เป็นกิจกรรมแนวแบทเทิลรอยัลจำกัดเวลา: คุณจะได้ใช้เวลาตามกำหนดบนแผนที่แชร์ร่วมกันเพื่อกำจัดมอนสเตอร์กลางสีแดงและขุดคริสตัล โดยคะแนนของคุณ—ไม่ใช่การสังหารผู้เล่นคนอื่น—จะเป็นตัวกำหนดระดับรางวัล สายฟรี (F2P) และสายเติมจะเริ่มต้นบนแผนที่ด้วยความเท่าเทียมกัน วินัยย่อมชนะเงินในกระเป๋า
คณิตศาสตร์ตารางคะแนน
แหล่งที่มาของคะแนนหลัก 3 ส่วน:
| แหล่งที่มา | คะแนน | ทำไมถึงสำคัญ |
|---|---|---|
| มอนสเตอร์กลางสีแดง (“ตัวแดง”) | ~1,500 ต่อตัว | ได้ทันที ทำซ้ำได้ และเกิดหนาแน่น นี่คือกระดูกสันหลังของการวิ่งเก็บคะแนนสำหรับสายฟรีทุกคน |
| เหมืองคริสตัล (โจมตีโหนดคริสตัลที่ผู้เล่นอื่นยึดอยู่) | ~5,000 ต่อนาทีที่ยึดครอง | พุ่งสูงได้รวดเร็วหากคุณครองพื้นที่ได้ต่อเนื่อง แต่ก็เสี่ยงหากคุณบุกตะลุยลึกเกินไป |
| การปลดล็อกสกิลส่วนตัว / บูสต์เกรดอุปกรณ์ | ตัวคูณแบบทวีคูณ | ตัวเสริมพลังแบบ passive สำหรับทุกอย่างข้างต้น |
สะสมแต้มจากตัวแดงตั้งแต่เนิ่นๆ เปลี่ยนไปเนืองเหมืองเมื่อสกิลของคุณสูงขึ้น แล้วคุณจะทำคะแนนแซงหน้าสายฟรีหรือสายแคชชวลส่วนใหญ่ได้
เส้นทางสำหรับสายฟรี (F2P Route)
- สำรวจแผนิตก่อน. ก่อนจะโจมตีอะไร ให้ซูมออกและหาจุดที่มีกลุ่มมอนสเตอร์สีแดงหนาแน่นที่สุดใกล้จุดเกิดของคุณ จุดเริ่มต้นที่ถูกต้องจะช่วยประหยัดเวลาเดินทัพไปได้ถึง 5 นาทีในทุกๆ รอบ
- ฟาร์มตัวแดงอย่างต่อเนื่องที่ ~1,500 แต้มต่อการฆ่า. จัดกลุ่มพวกมัน: จอดทัพของคุณไว้เพื่อให้การฆ่าแต่ละครั้งต่อเนื่องไปยังตัวถัดไปโดยใช้เวลาเดินทางเกือบเป็นศูนย์ กฎของ Korpez: ถ้าแถบเดินทัพว่างงานเมื่อไหร่ แสดงว่าคุณเลือกจุดผิด
- ปลดล็อกผังสกิลของคุณทันที. แผงสกิลกิจกรรมคริสตัลจะเปิดขึ้นที่ด้านข้างของหน้าจอ — เทแต้มลงในโบนัสการฆ่าตัวแดง ตามด้วยความเร็วเคลื่อนที่ และโบนัสเหมือง อย่ารอช้า เพราะทุกนาทีที่ล่าช้าคือเวลาตัวคูณที่เสียไป
- ใช้แอปนาฬิกาจับเวลา/ตัวจับเวลาสำหรับหน้าต่างเหมือง. การตีเหมืองที่มีผู้ครอบครองอยู่จะให้ผลตอบแทน ~5K ต่อนาทีที่คุณยึดครอง ตั้งเวลาล่วงหน้าสำหรับรอบการจ่ายแต้ม เพื่อที่คุณจะสามารถแย่งเหมืองได้ทันทีในจังหวะที่คู่แข่งหมุนเวียนออกจากจุดนั้น
- หลังจากนั้นค่อยแย่งชิงเหมือง. เมื่อคุณเคลียร์ตัวแดงหมดแล้วหรืออัปเกรดสกิลจนเต็มแล้ว ให้กระโดดเข้าใส่เหมืองที่มีการแข่งขันกลางรอบ โดยอุดมคติคือเหมืองที่เจ้าของเพิ่งเดินออกไปหาฝูงตัวแดงกลุ่มอื่น
กฎวินัย
- ห้ามว่างงานเด็ดขาด. ฟาร์มตัวแดงต่อเนื่อง 25 นาที > เดินเร่ร่อน 35 นาที
- อย่าเพิ่งสู้กับผู้เล่นอื่นตั้งแต่เนิ่นๆ. การดวล PvP จะเป็นการป้อนคะแนนให้คู่แข่งและขัดขวางการวิ่งทำคะแนนสีเขียวของคุณ เปลี่ยนเป้าหมายหนีซะ แล้วค่อยกลับมาทีหลัง
- อย่าไล่ล่าเหมืองที่มีการแข่งขันคนเดียว. คุณจะเสียเวลา 60 วินาทีและได้กลับมา 5K — ในขณะที่การฆ่ามอนสเตอร์แดงสามตัวจะให้ผลตอบแทน 4.5K ต่อ 90 วินาทีโดยไม่มีความเสี่ยงเลย ยึดเหมืองเฉพาะตอนที่ไม่มีใครแย่งหรือตอนที่มีกำลังสนับสนุนหนาแน่นเท่านั้น
- สกิลไม่ใช่สิ่งที่คุณจะมองข้ามได้. แต้มสกิลจะไม่ฟาร์มให้คุณเอง — เปิดแผงนั้นทันทีที่คุณเห็นมัน
วิธีรับมือสายเติม (Whales)
ผู้เล่นที่เติมเงินมักจะซื้อแพ็กความเร็วการเดินทัพและสกิลที่แข็งแกร่งกว่าเร็วกว่า วิธีแก้ไม่ใช่การแข่งความเร็วกับพวกเขา — แต่คือการ มีวินัยเหนือกว่า: ตีตัวแดงให้ได้มากกว่าต่อนาที, ไม่เสียเวลาแม้แต่วินาทีเดียวไปกับการสู้กับพวกเขา, และขโมยเหมืองที่พวกเขาเพิ่งเคลียร์ไปทันทีที่พวกเขาเดินจากไป สายเติมส่วนใหญ่จะไปติดเพดานอยู่ที่เหมือง 5K ในขณะที่การวิ่งฟาร์มตัวแดง 30 ตัวต่อนาทีแบบสะอาดๆ ของสายฟรีจะทำให้อยู่ในระดับรางวัลเดียวกัน
📊 ตารางคะแนนและรางวัล
ค่าที่ตรวจสอบแล้วจากข้อมูลไคลเอนต์เกม (v1.0.87), แหล่งที่มา: wiki-last-asylum.com แสดงค่าพื้นฐานโดยยังไม่รวมโบนัสจากการวิจัยในสถาบัน (Academy) หรือกิจกรรม
แหล่งที่มา: wiki — black-mine
สายแร่ (Veins)
| สายแร่ | สต็อก | อัตรา |
|---|---|---|
| คริสตัลคลัสเตอร์ 1 | 8,640 | 12 |
| คริสตัลคลัสเตอร์ 2 | 17,280 | 24 |
| คริสตัลคลัสเตอร์ 3 | 34,560 | 48 |
| อินสแตนต์คลัสเตอร์ 4 | 4,000 | 200 |
สกิลเหมือง
| สกิล | เอฟเฟกต์ | ต้นทุน |
|---|---|---|
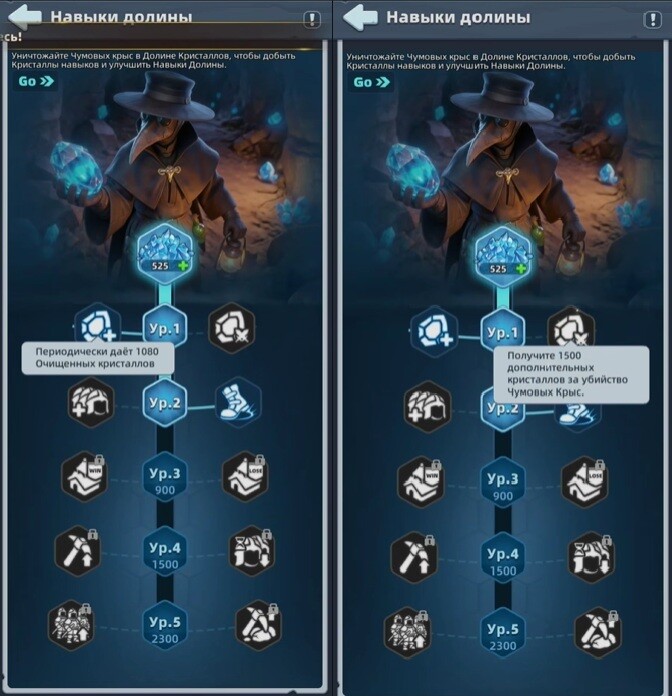
| คริสตัลเซิร์จ (Crystal Surge) | รับคริสตัลบริสุทธิ์ 1080 ชิ้นเป็นระยะ | 200 |
| นักล่าหนูโรคระบาด (หนูโรคระบาด Hunter) | รับคริสตัลเพิ่ม 1500 ชิ้นเมื่อคุณสังหารหนูโรคระบาด | 200 |
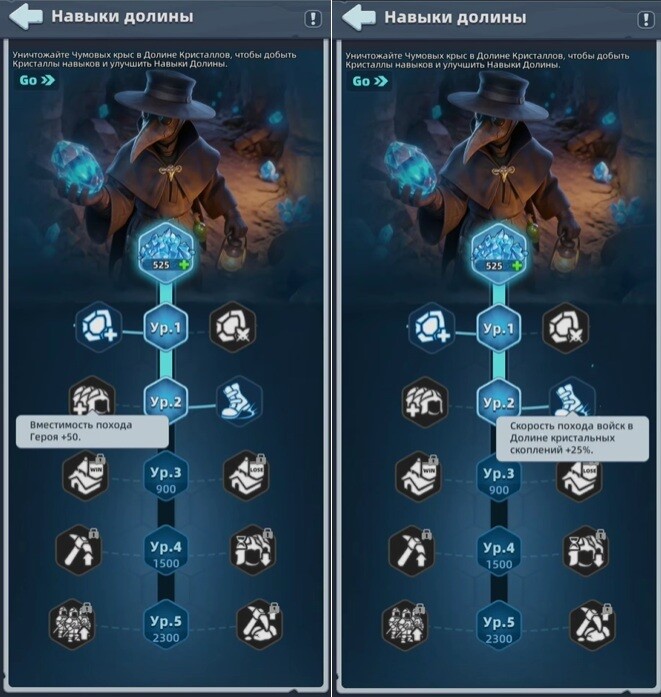
| การขยายกำลังพล (Force Expansion) | ความจุทัพฮีโร่เดี่ยว +50 | 500 |
| เดินทัพว่องไว (Swift March) | ความเร็วเดินทัพกองกำลังในหุบเขาคริสตัลระยิบระยับ +25% | 500 |
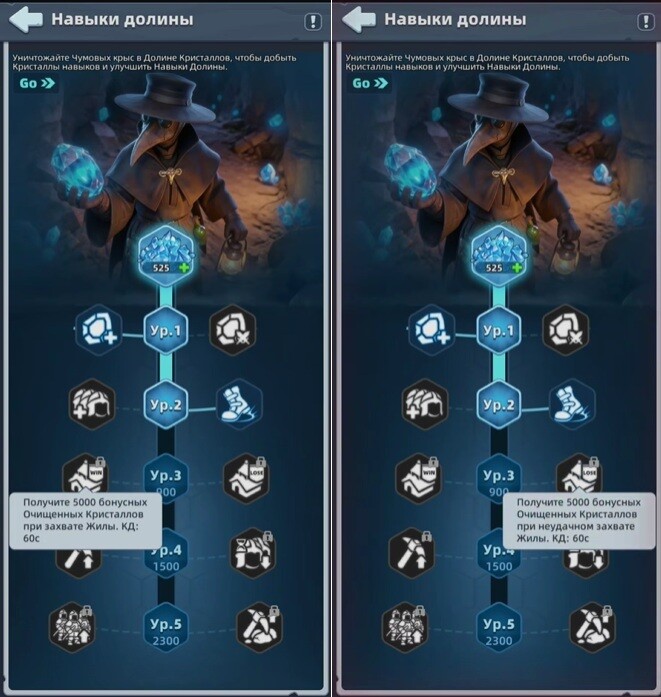
| ปล้นสะดมภ์หุบเขา (Valley Plunder) | รับคริสตัลบริสุทธิ์เพิ่ม 5000 ชิ้นเมื่อคุณยึดครองแหล่งแร่ คูลดาวน์: 60s | 900 |
| เฝ้าระวังหุบเขา (Valley Vigil) | รับคริสตัลบริสุทธิ์เพิ่ม 5000 ชิ้นเมื่อคุณล้มเหลวในการยึดครองแหล่งแร่ คูลดาวน์: 60s | 900 |
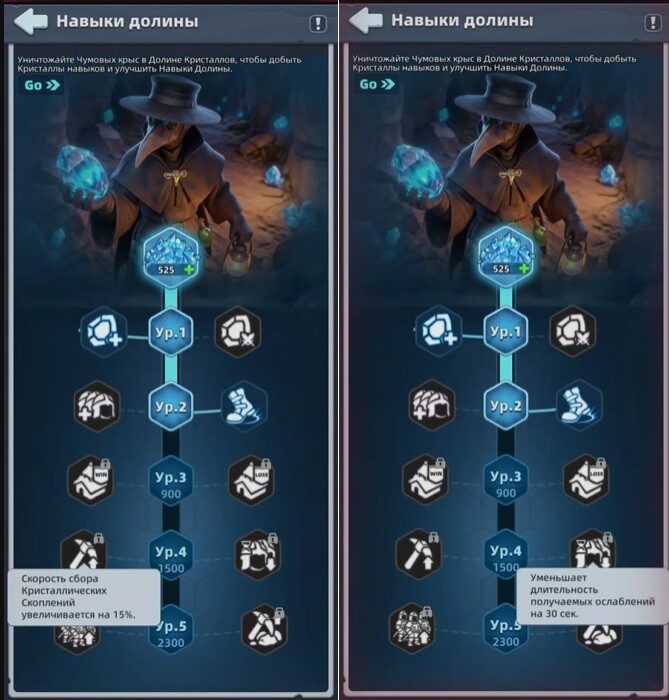
| การขุดคริสตัล (Crystal Mining) | ความเร็วในการเก็บเกี่ยวคลัสเตอร์คริสตัลเพิ่มขึ้น 15% | 1,500 |
| เจตจำนงเหล็กกล้า (Iron Will) | ลดระยะเวลาของดีบัฟที่ได้รับลง 30s | 1,500 |
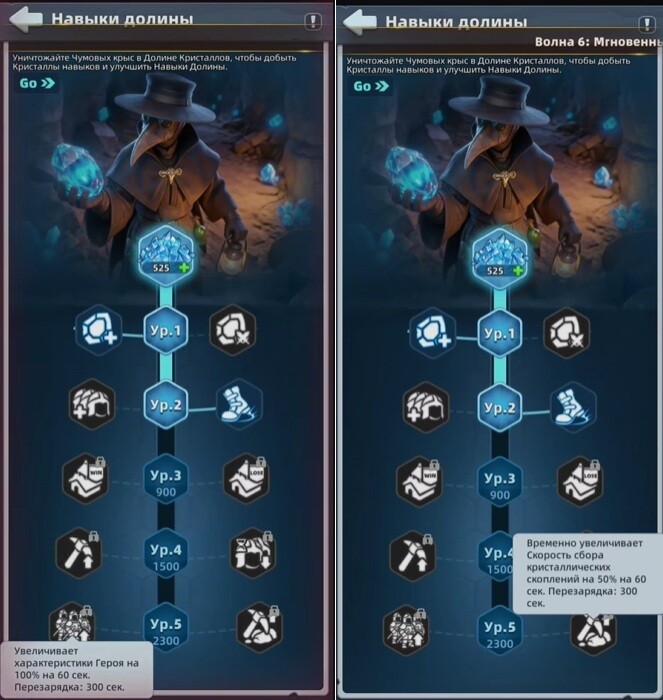
| ตื่นรู้แห่งหุบเขา (Valley Awakening) | เพิ่มความเสียหายฮีโร่ 15% เป็นเวลา 60s คูลดาวน์: 300s | 2,300 |
| เสียงสะท้อนคริสตัล (Crystal Resonance) | เพิ่มความเร็วในการเก็บเกี่ยวคลัสเตอร์คริสตัลชั่วคราว 50% เป็นเวลา 60s คูลดาวน์: 300s | 2,300 |
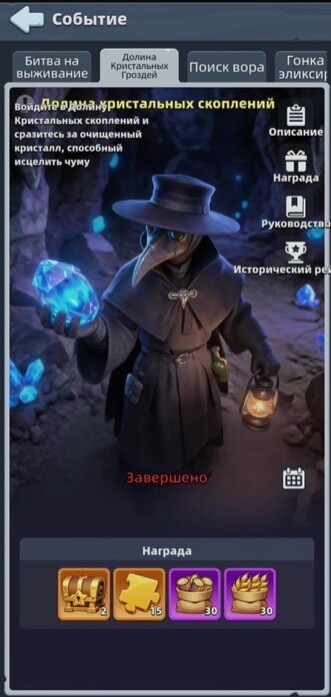
เจาะลึก Crystal Valley: จังหวะเวลา, การเทเล포ต และการเลือกสกิล
การแข่งขันทำแต้มเดี่ยว (Solo) ระยะเวลา 30 นาทีบนแผนที่แยกต่างหาก: เก็บผลึก, ยึดช่อง, ฆ่าหนู, และอัปเลเวลสกิลชั่วคราว ความไม่ใส่ใจจะถูกลงโทษอย่างรวดเร็ว — ตำแหน่งเริ่มต้นที่แย่, การเดินทัพที่นานเกินไป, หรือการพลาดช่วงเวลาผลึกทันที จะมอบแต้มให้กับผู้เล่นคนอื่นทั้งหมด พลังช่วยได้มากบริเวณบัลลังก์และช่องระดับ 3 แต่ผู้เล่นทั่วไปที่ฟาร์มอย่างมั่นคงมักทำแต้มได้มากกว่าผู้เล่นสายเปย์ที่ไม่มีสมาธิ
รูปแบบและกฎของกองทัพ
- อีเวนต์แบบเดี่ยว ไม่ใช่อล라이언ซ์ (พันธมิตร) คุณต้องแข่งขันแม้กระทั่งกับสมาชิกในแคลนเดียวกันภายในหุบเขา อย่าก่อกวนพันธมิตร แต่ก็อย่าคาดหวังว่าใครจะยอมหลีกทางให้
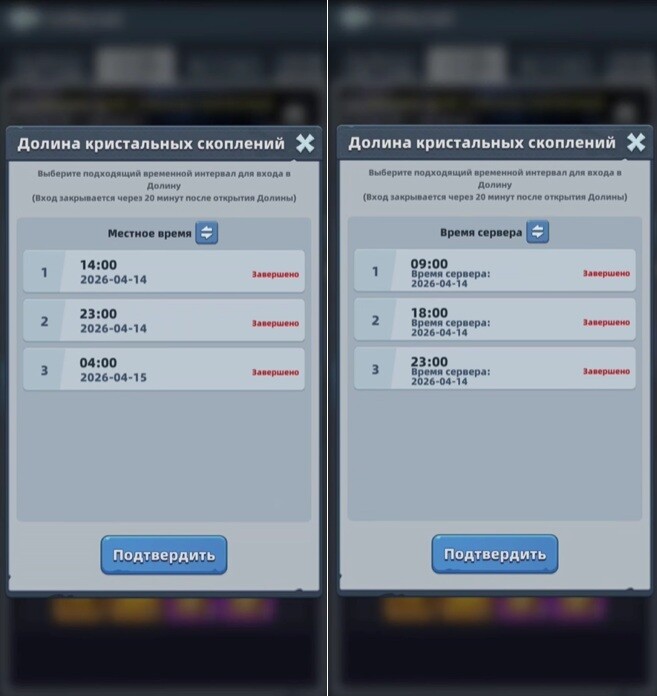
- 30 นาที, สามช่วงเวลา, หนึ่งความพยายาม คุณสามารถเล่นได้เพียงแค่ช่วงเวลาเดียวเท่านั้น — คอยดูปฏิทินให้ดีเพื่อไม่ให้พลาด สำหรับเซิร์ฟเวอร์เก่าเท่านั้น หากเซิร์ฟเวอร์ของคุณยังไม่มีหุบเขา แสดงว่ายังมาไม่ถึงขั้นนั้น
- ทหารปฏิบัติตามกฎของอีเวนต์ จำนวนคนขึ้นอยู่กับความจุของค่ายทหาร (Barracks) และระดับ (Tier) คือระดับสูงสุดที่คุณปลดล็อกแล้ว ความสูญเสียจะอยู่ภายในอีเวนต์เท่านั้นและไม่ส่งผลต่อกองทัพถาวรของคุณ
- การรักษาใช้ไอเทมเร่งเวลาเท่านั้น (การรักษาหรือเร่งเวลาสากล) การต่อสู้ตลอดเวลาจะผลาญไอเทมเร่งเวลาเดียวกับที่ฐานและงานวิจัยของคุณต้องใช้ — สายฟรี (F2P) ควรหลีกเลี่ยงการต่อสู้ที่ไร้ความหมาย
- ไม่มีการโจมตีเมือง การต่อสู้มีไว้สำหรับช่องทรัพยากรเท่านั้น: โค่นผู้ถือครองเดิม, ยึดจุดนั้น, และเก็บเกี่ยว
2 นาทีแรกและการเทเล포ต
หลังจากเข้าสู่แมพ คุณจะได้รับ เวลาเตรียมตัว 2 นาที ณ จุดเกิดแบบสุ่ม ให้ตรวจสอบก่อนเคลื่อนย้าย: มีช่องระดับ 2 อยู่ใกล้ๆ ไหม, มีหนูเกิดใกล้ๆ หรือเปล่า, ไม่มีกลุ่มผู้เล่นที่แข็งแกร่งอยู่หนาแน่น, ระยะเดินทัพสั้น, และมีพื้นที่ให้เคลื่อนไหว ข้อผิดพลาดคลาสสิกคือการพุ่งตรงไปที่Aตรงกลาง — ผู้เล่นนอกกระแสจะถูกขับไล่และเสียเวลาไปกับการเดินทัพแทนที่จะฟาร์ม

- การเทเล포ตฟรีจะรีเฟรชทุกๆ 6 นาที ให้ใช้มันเมื่อจุดนั้นหมดประโยชน์ (เพื่อนบ้านแข็งแกร่ง, ช่องมีการแย่งชิงสูง, ไม่มีหนู, ถูกโจมตีขับไล่ตลอดเวลา)
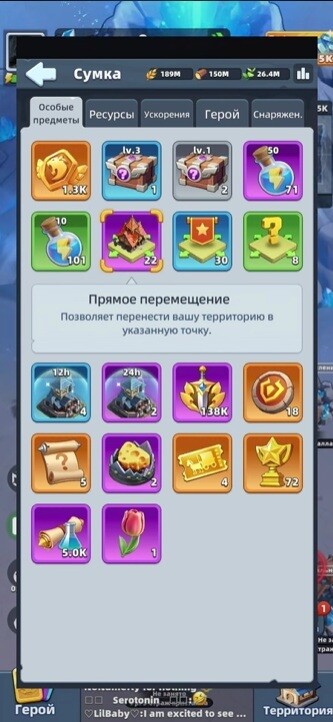
- การเทเล포ตแบบเสียค่าใช้จ่ายจะเพิ่มขึ้นเรื่อยๆ: 1, 2, 3, 4 และ 5 ครั้งต่อการกระโดด เทเล포ตเมื่อมีเป้าหมายที่แน่นอนเท่านั้น (โซนว่างที่มีช่องดีๆ และมีหนู) อย่าเทเล포ตเพียงเพราะ “รู้สึกว่าตรงโน้นน่าจะดีกว่า” — คนอื่นกำลังฟาร์มกันหมดในขณะที่คุณกำลังบิน
ช่องทรัพยากรและบัลลังก์
| ช่อง (Tile) | ผลผลิต | เหมาะสำหรับใคร |
|---|---|---|
| ระดับ 1 | ต่ำที่สุด, สงบ | เรียนรู้อีเวนต์, วิ่งฟาร์มแบบไร้การต่อสู้ |
| ระดับ 2 | ดี, มีการแข่งขันปานกลาง | ค่าเริ่มต้นสำหรับผู้เล่นที่ไม่ใช่สายเปย์ส่วนใหญ่ |
| ระดับ 3 (ใกล้บัลลังก์) | อัตราผลตอบแทนดีที่สุด, แย่งชิงดุเดือด | ไอดีที่แข็งแกร่งซึ่งสามารถรักษาพื้นที่ไว้ได้ |
หากคุณไม่สามารถครองช่องระดับ 3 ได้ ผลผลิตที่ได้จะน้อยกว่าช่องระดับ 2 เงียบๆ เสียอีก: เข้าไปยึด, ถูกเตะออก, เดินทัพกลับไป, แล้วทำซ้ำ การฟาร์มช่องระดับ 2 อย่างมั่นคง 30 นาที ย่อมดีกว่าการใช้เวลา 30 นาทีไปกับการพิสูจน์ตัวเองกับกลุ่มท็อป
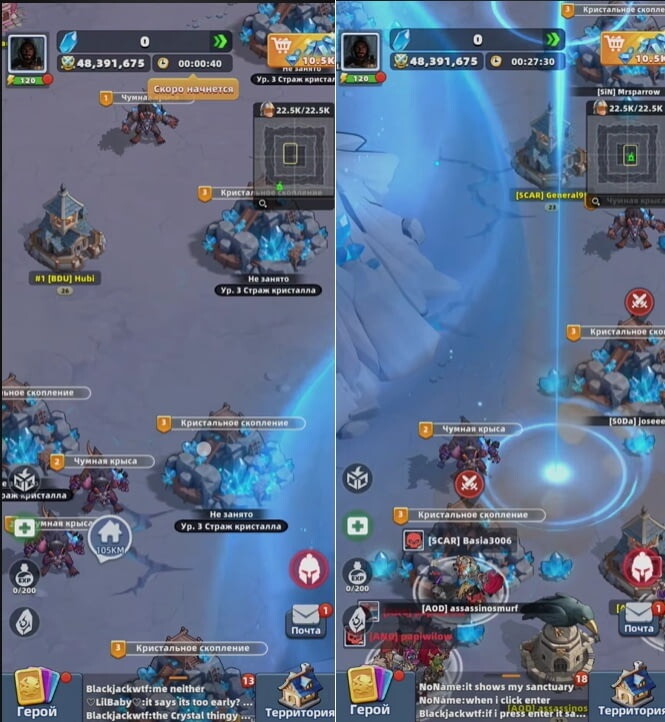
- การต่อสู้ชิงบัลลังก์จะเริ่มขึ้น 23 นาทีหลังเริ่มเกมและกินเวลา 7 นาที สำหรับไอดีที่แข็งแกร่งที่มีกองทัพ ฮีโร่ และกระหายสงคราม นี่คือเป้าหมายที่สมเหตุสมผล สำหรับสายฟรี/สายเปย์น้อย อย่าตั้งให้เป็นแผนหลัก: ในขณะที่พวกท็อปสู้กันตรงกลาง ช่องปกติมักจะเงียบสงบและฟาร์มได้ คะแนนส่วนใหญ่ได้มาก่อนถึงช่วงชิงบัลลังก์อยู่แล้ว — ช่องทรัพยากร, การเก็บเกี่ยว, หนู, และผลผลึกที่กระจัดกระจาย

หนูและการแยกตัวช่วงต้นเกม
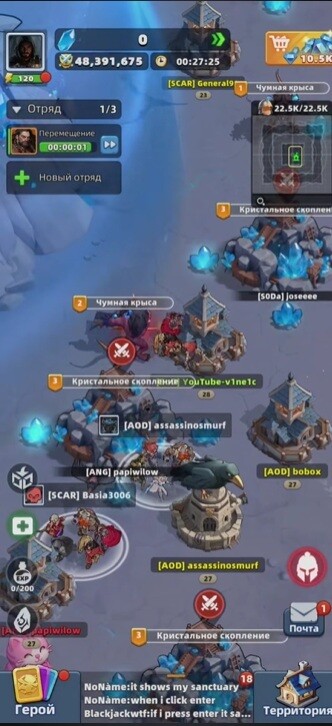
การฆ่าหนูจะให้ ค่าประสบการณ์สกิลอีเวนต์ — ยิ่งหนูเลเวลสูง ยิ่งได้ XP มาก ยิ่งปลดล็อกสกิลเร็วเท่าไหร่ ก็ยิ่งได้รับประโยชน์นานขึ้นเท่านั้น อย่าส่งทุกกองทัพไปเก็บเกี่ยวตั้งแต่เริ่ม: หากมี 3 กองทัพ ให้ส่ง 1 เก็บเกี่ยว + 2 ล่าหนู; หากมี 4 กองทัพ ให้ส่ง 1 เก็บเกี่ยว + 2–3 ล่าหนูและคอยระวังสถานการณ์ การมีกองทัพที่ 4 คือข้อได้เปรียบที่แท้จริงในจุดนี้ หนูจะถูกแย่งชิงกันฆ่าอย่างรวดเร็ว แต่ถ้าเมินพวกมัน เท่ากับคุณทิ้งศักยภาพส่วนใหญ่ของอีเวนต์ไปเลย
การเลือกสกิลทรี
เป็นสกิลชั่วคราวสำหรับรอบเดียวแล้วรีเซ็ต มีสองสาย, ห้าเลเวล, เลือกได้เลเวลละหนึ่งอย่าง สี่เลเวลแรกเป็นแบบติดตัว (Passive); เลเวลที่ 5 เป็นแบบกดใช้ (Active) มี คูลดาวน์ 5 นาที จงเลือกตามสไตล์การเล่นของคุณ ไม่ใช่แค่เลือกตัวเลขที่ดูเยอะกว่า
- เลเวล 1: ซ้าย — รายได้ฟรีเป็นระยะ 1,080 ผลึก; ขวา — 1,500 ต่อการฆ่าหนู 1 ตัว ฝั่งขวาจะคุ้มก็ต่อเมื่อมีหนูหนาแน่นและเคลียร์ได้เร็ว ฝั่งซ้ายคือรายได้ที่ปลอดภัยเมื่อหนูหายากหรือมีการแย่งชิงสูง
- เลเวล 2: ซ้าย — ทัพนักรบ +50 นาย; ขวา — ความเร็วในการเดินทัพ +25% ความเร็วมักจะเป็นฝ่ายชนะ: ไปถึงหนู, ช่องทรัพยากร และผลึกอิสระได้เร็วกว่า ความจุไม่เคยแก้ปัญหาที่แท้จริงของหุบเขาได้ นั่นคือ — เวลา 30 นาทีที่มีจำกัด
- เลเวล 3: ซ้าย — 5,000 ผลึกต่อการยึดช่องสำเร็จ (สูงสุดหนึ่งครั้งต่อนาที); ขวา — 5,000 เมื่อหน่วยของคุณพ่ายแพ้บนช่องนั้น สำหรับการเล่นปกติให้เลือกโบนัสการยึดครอง; อย่าสร้างแนวทางโดยอิงจากการพ่ายแพ้ โดยเฉพาะอย่างยิ่งเมื่อการรักษานั้นต้องใช้ไอเทมเร่งเวลา
- เลเวล 4: ซ้าย — ความเร็วในการเก็บเกี่ยวช่อง +15%; ขวา — ล้างดีบัฟบนฮีโร่ที่พ่ายแพ้เร็วขึ้น สายเก็บเกี่ยวเลือกซ้าย; สายสู้บัลลังก์เลือกขวา
- เลเวล 5 (กดใช้): ซ้าย — สเตตัสฮีโร่ +100% เป็นเวลา 60 วินาที; ขวา — เก็บเกี่ยวช่อง +50% เป็นเวลา 60 วินาที สายต่อสู้เลือกซ้าย, สายฟาร์มเลือกขวา — และกดใช้ในจังหวะที่สำคัญจริงๆ (ก่อนการต่อสู้, การยึดจุดสำคัญ, การเก็บเกี่ยวทรัพยากรจำนวนมาก) ไม่ใช่กดทันทีที่คูลดาวน์เสร็จ
PvP และผลึกทันที
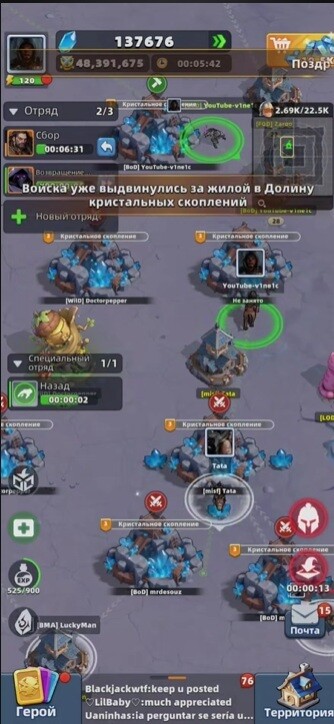
- ไม่มีคะแนนสำหรับการสังหารผู้ถือครองช่องโดยตรง การโจมตีที่ดีคือการโจมตีที่ได้ทั้งตำแหน่ง + ผลึก: เหยื่อจะทำผลึกที่เก็บเกี่ยวไว้ตกกระจัดกระจายรอบๆ ช่อง ซึ่งคุณสามารถกวาดเก็บได้แถมยังได้ครอบครองจุดนั้นด้วย โจมตีเฉพาะเมื่อมีแต้มต่อ (ผู้ถือครองอ่อนแอกว่า, คนเก็บเกี่ยวนั่งแช่นานเกินไป, หรือมีจุดเก็บด่วนอยู่ใกล้ๆ) นอกจากนี้ให้คว้าผลึกอิสระที่มองเห็นได้ใกล้ช่องของคนอื่นด้วย — เป็นแต้มที่ได้เร็วและแทบไม่มีความเสี่ยง
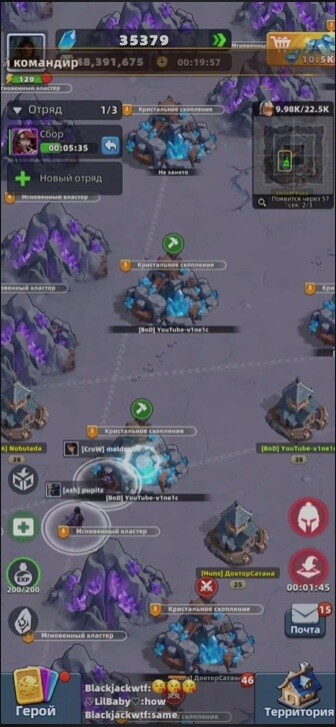
- ผลึกทันที (Instant crystals) จะเกิดราวๆ นาทีที่ 10, 11, 12, 20, 21 และ 22 พวกมันเก็บเกี่ยวได้เร็วและให้ผลตอบแทนสูง เตรียมกองทัพของคุณบางส่วนให้พร้อมใกล้ช่วงเวลานั้น — บางครั้งอาจต้องดึงกองทัพออกจากช่องปกติเพื่อมาแย่งชิง นี่คือกลไกการไล่ตามที่ดีที่สุดสำหรับสายฟรี: ไม่จำเป็นต้องสู้แย่งบัลลังก์
แผนการเล่นแบบง่ายและจุดที่แต้มรั่วไหล
เริ่มต้น: สำรวจในช่วงเตรียมตัว, หลีกเลี่ยงตรงกลาง, ปักหลักใกล้ช่องระดับ 2 ที่มีหนู หลังเริ่มเกม: 1 กองทัพเก็บเกี่ยว, ที่เหลือล่าหนูเพื่อปลดล็อกสกิลอย่างรวดเร็ว ช่วงกลาง: ครองจุดที่เหมาะสม, ให้ทุกกองทัพทำงานตลอดเวลา, เตรียมตัวสำหรับนาทีที่ 10/11/12 และ 20/21/22; หลังจากนาทีที่ 23 ผู้เล่นที่ไม่เล่นสายบัลลังก์ให้ฟาร์มต่อไป กฎของสายฟรี: ช่องระดับ 2, ล่าหนูเพื่อเอาสกิล, ช่วงชิงผลึกทันที, ไม่เทเล포ตเสียเงินแบบสุ่ม, ไม่สู้จนต้องผลาญเร่งเวลา ไอดีที่แข็งแกร่งจะเพิ่มช่องระดับ 3 และบัลลังก์เข้ามา — แต่ก็ยังต้องฟาร์ม, อัปสกิล และเก็บผลึกทันทีก่อนนาทีที่ 23
คะแนนรั่วไหลมาจาก: การเลือกจุดเริ่มต้นที่ช้า, การเดินทัพไกลไปหาหนูที่อยู่ไกล, พลาดช่วงเวลาผลึกทันที, สู้โดยไม่มีแต้มต่อ, การเทเล포ตเสียเงินแบบสุ่ม, และการยึดติดกับช่องที่ไม่สามารถป้องกันได้ ทุกการกระทำควรทำคะแนนหรือปรับปรุงตำแหน่งให้ดีขึ้น — ไม่อย่างนั้นให้ข้ามไปซะ
ที่มา: Last Asylum: Plague - гайд по Долине кристальных скоплений. Секреты, советы и тактика от новичка до топа. โดย Гейм-Знаток บน DTF..
🎥 วิดีโอแนะนำ
วิดีโอแนะนำและบทวิเคราะห์กลยุทธ์ที่คัดสรรจากผู้สร้างคอนเทนต์ในชุมชน
📝 ถอดข้อความ 15:28 (928 сек) ▼
ค้นหาหัวข้อนี้บน YouTube: «Crystal Cluster Valley»
คำค้นหา: Last Asylum Plague Crystal Cluster Valley guide
❓ FAQ — คำถามที่พบบ่อย
ทีม F2P ที่ดีที่สุดใน Last Asylum: Plague คืออะไร?
ทีม F2P มาตรฐานคือ Arthur, Daskal, Marlena, Harper, Claire (ทั้งหมดเป็นสาย Warrior — การใช้ฮีโร่ฝ่ายเดียวกันหมดจะได้รับโบนัส HP/ATK/DEF +20%) Arthur ได้รับฟรีตั้งแต่วันแรก ส่วนการเติมเงิน 1 ดอลลาร์เพื่อรับ Marlena ถือว่าคุ้มค่าที่สุดในเกม Daskal จะมาในช่วงซีซั่นแรกของ Era of Revival (วันที่ 120 ขึ้นไป)
ควรจะอัปเกรดอะไรก่อนดี?
อัปเกรด Sanctuary ก่อนเสมอ เพราะเป็นตัวกำหนดเลเวลของสิ่งก่อสร้างอื่นๆ ทั้งหมดและขีดจำกัดเลเวลของฮีโร่ จากนั้นตามด้วย Training Grounds, Barracks, Research Lab, Infirmary และ Wall ควรรักษาเลเวลของ Builder’s Hut ให้เท่ากับ Sanctuary จนถึงเลเวล 15 เพื่อรับโบนัสความเร็วในการก่อสร้างฟรี
Marlena ปลดล็อกเมื่อไหร่?
ได้รับฟรีในวันที่ 66 หรือรับได้ทันทีผ่านการเติมเงินเริ่มต้น 1 ดอลลาร์ ให้เก็บ UR shards ไว้เพื่อให้เธอขึ้น 8★ ได้ทันที จากนั้นค่อยดันไปที่ 10★
จะหา Cynthia ในฐานะผู้เล่น F2P ได้อย่างไร?
Cynthia จะมาในกิจกรรม Wishing Wheel วันที่ 8 ให้เก็บสะสมเพชรตั้งแต่วันแรก (งดใช้จ่ายอย่างอื่น) — ต้องใช้ประมาณ 11,500 เพชร และต้องหมุนแบบ ×10 เสมอ (การหมุนทีละครั้งจะทำให้เสียโทเค็นเปล่า)
จะหา Antitoxin ได้อย่างไร?
ผลิตจาก Antitoxin Workshop + Stable, ทุกครั้งที่อัปเกรดสิ่งก่อสร้างเสร็จ, ทำภารกิจ Falcon Quests (เกือบทั้งหมด), Covert Ops และ Caravan Trade (รวมถึงการปล้น Ops ของผู้อื่น — สูงสุด 5 ครั้งต่อวัน) และการล่า Blight/Elite Blight (ใช้พลังงาน 10/20) กิจกรรมต่างๆ ก็ให้รางวัลจำนวนมาก
ทำไมรายได้จากการปล้นของฉันถึงลดลงจนเกือบเป็นศูนย์?
คุณถึงขีดจำกัดการปล้นรายวันแล้ว: ต่ำกว่าขีดจำกัดจะได้รับ 100%, ตั้งแต่ 1 เท่าของขีดจำกัดจะเหลือเพียง 15%, และตั้งแต่ 1.3 เท่าจะเหลือเพียง 5% ขีดจำกัดจะรีเซ็ตตอน 02:00 UTC ขีดจำกัดจะเพิ่มขึ้นตามเลเวล Sanctuary (2.5 ล้านที่เลเวล 10–12 จนถึง 30 ล้านที่เลเวล 30) และจะเพิ่มขึ้นทันทีเมื่อคุณอัปเกรด Sanctuary จะมีสัญลักษณ์สามเหลี่ยมสีเหลืองใต้ค่า Might เพื่อแสดงสถานะนี้
ควรซื้ออะไรในร้านค้าบ้าง?
ร้านค้า Sanctuary/Expedition/Alliance: ให้ซื้อ Crow Essence และ UR Hero Omnifragments ก่อนเสมอ ร้าน Honor shop มีไว้สำหรับพิมพ์เขียวอุปกรณ์เท่านั้น (ห้ามซื้อหีบ epigraph ที่นั่นเด็ดขาด) ร้านค้าทั้งหมดจะรีสต็อกในวันจันทร์
คุ้มไหมที่จะใช้เพชรซื้อไอเทมเร่งความเร็ว (speedups)?
เฉพาะไอเทมเร่งความเร็ว 8 ชม. ในร้าน VIP เท่านั้นที่ถือว่ายอมรับได้ และต้องซื้อหลังจากซื้อทรัพยากรสำหรับฮีโร่แล้วเท่านั้น กฎของชุมชนคือ: ห้ามนำเพชรไปทุ่มกับ speedups แทนที่จะเก็บไว้สำหรับกิจกรรมหมุนฮีโร่ (Cynthia วันที่ 8, Joker หลังวันที่ 15)
ควรสร้างทีมฝ่ายไหนดี?
สาย Warrior ดีที่สุดในช่วงต้นเกม (ได้ shards ของ Arthur/Harper ฟรี และ Marlena จากการเติม 1 ดอลลาร์) สาย Ranger จะเก่งที่สุดในช่วงกลางเกม (ใช้แก้ทาง Warrior) สาย Warlock ดีที่สุดในช่วงท้ายเกมแต่ต้องใช้การลงทุนระยะยาวสูง การเล่นแบบฝ่ายเดียว (ฮีโร่ 5 ตัวประเภทเดียวกัน) คือเมต้าในปัจจุบันเพราะ UR epigraph จะบัฟให้ฝ่ายเดียวเท่านั้น
การแปลงร่าง Claire จาก SSR เป็น UR ทำงานอย่างไร?
เปิดใช้งานในวันที่ 8 ของ Era เธอจะเริ่มที่ 6★ และการอัปไปถึง 10★ ต้องใช้ 1,600 SSR shards (แต่ละขั้นย่อยใช้ราคา 2 เท่าของราคา SSR) จะมีช่วงที่บัฟทีมลดลงระหว่าง 6★–9★ — ให้ข้ามช่วงนี้โดยการสะสมเลเวล Hall of Honor ก่อนทำการแปลงร่าง (เลเวล 60→8★, เลเวล 100→9★, เลเวล 160→10★ ทันที)
จะแลกของขวัญ (gift codes) ได้อย่างไร?
ในเกม: ไปที่ Avatar (มุมซ้ายบน) → Settings → Gift Code สำหรับ iOS หรือเว็บ: ล็อกอินที่หน้าเว็บไซต์แลกของรางวัลอย่างเป็นทางการด้วยบัญชี Facebook/Google ที่เชื่อมไว้ เลือกเซิร์ฟเวอร์และตัวละคร แล้วกรอกโค้ด
ข้อผิดพลาดที่ใหญ่ที่สุดของผู้เล่นใหม่คืออะไร?
การอัปเกรดทุกอย่างเท่าๆ กันแทนที่จะเน้นทีมหลักทีมเดียว, การตัดสินฮีโร่ก่อนที่จะมีดาวสูงๆ (Marlena เป็นตัวละครที่เก่งช้าแต่เก่งมาก), การกระจายวัสดุ Awakening ให้ฮีโร่หลายตัว, การใช้เพชรไปกับเลเวล VIP แทนที่จะเก็บไว้สำหรับกิจกรรมหมุนฮีโร่, การพลาดการปล้นรายวัน (~27 ล้านทรัพยากรต่อวัน), และการปล่อยให้พลังงานเต็มจนเสียเปล่า
📖 อ่านต่อ
คู่มือนี้มีประโยชน์หรือไม่?